[Python] 349 C++ソースコードとJSON要素の照合 その1

[M1 Mac, Monterey 12.6.3, Python 3.10.4]

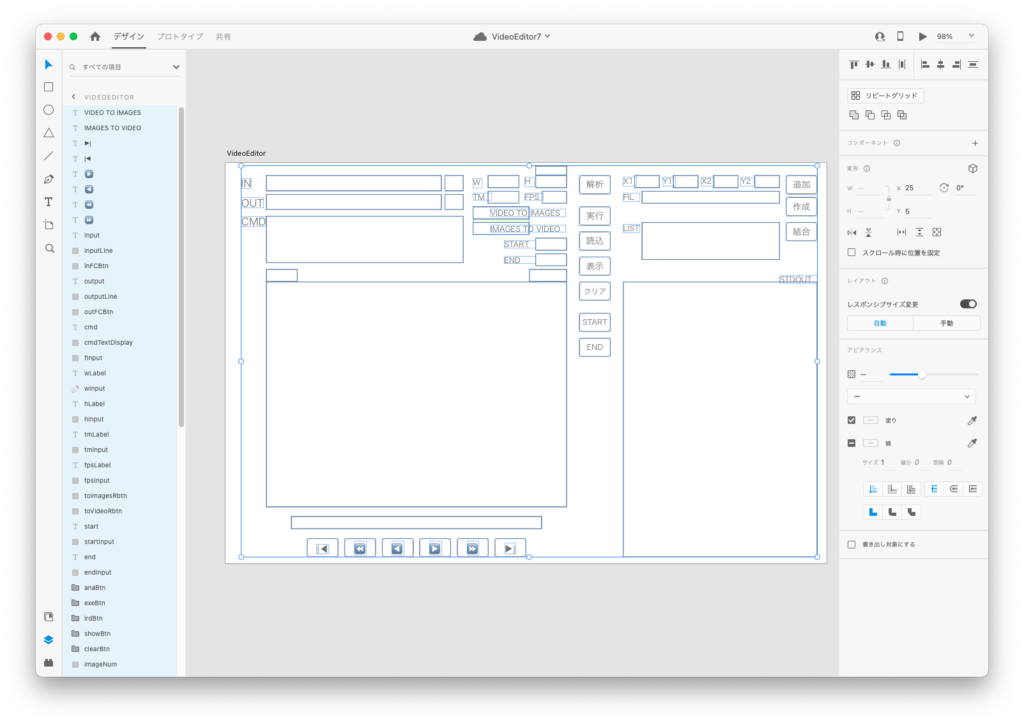
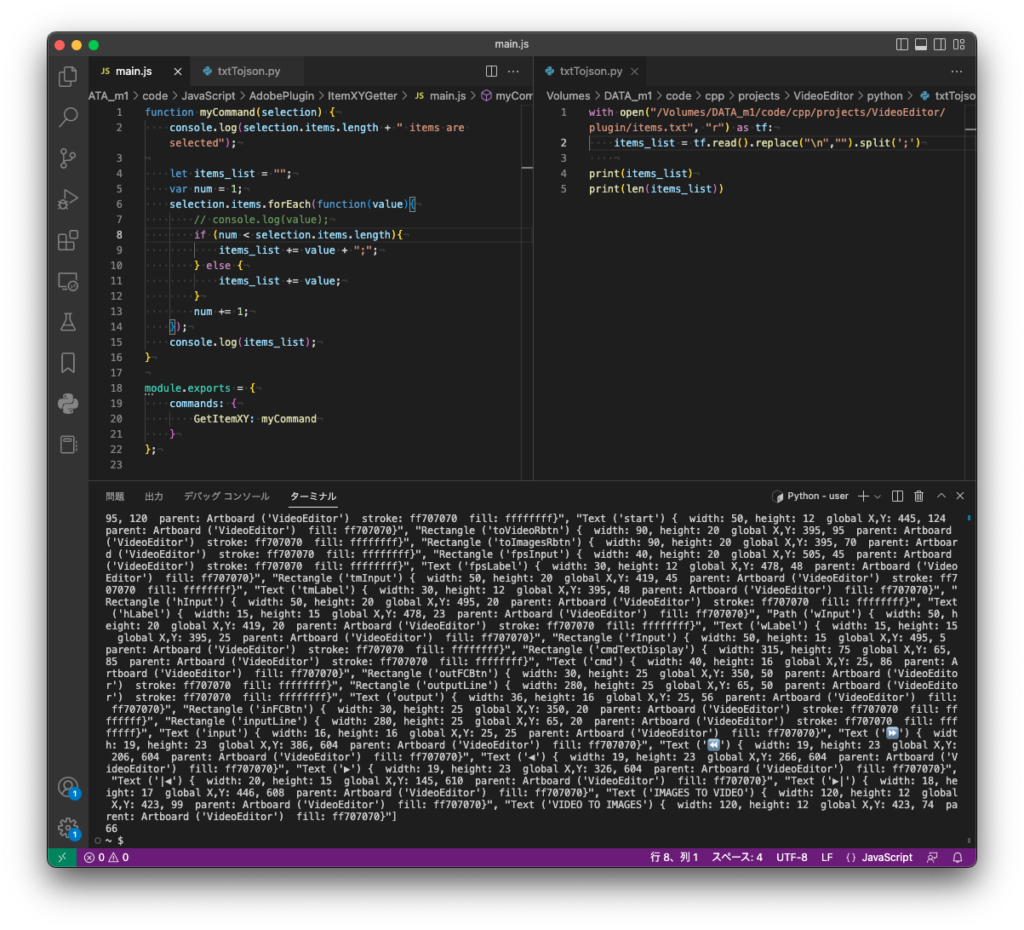
C++ソースコードを読み込み、JSON要素との照合を行い、その結果をBool値で返すスクリプトを書きました。

具体的にはFLTKウィジェットの新しいオブジェクトを作成する行の座標、幅、高さがAdobe XDのデータと一致しているかどうか判定します。

一致していなければAdobe XDのデータに書き換えます。この部分については次回以降記事にする予定です。

久々にpandasの出番でした。相変わらずの高機能です。

import pandas as pd

file = '/VideoEditor/src/VideoEditor.cpp'

with open(file) as f:
    lines = f.readlines()

# 改行コードを削除    
lines_strip = [line.strip() for line in lines]

df = pd.read_json('items.json')
print(df)

columns = df.columns.values
print(columns)

for col in columns:
    data = df.loc[:, col]
    # print(data.values)
    data2 = str(data.values[0]) + "," + str(data.values[1]) + "," + str(data.values[2]) + "," + str(data.values[3])
    print(data2)
    
    var_str = col + " = new"   
    print(var_str) 
    
    line_str = [line for line in lines_strip if var_str in line]
    
    try:
        line_str2 = line_str[0]
        print(line_str)
        str_exist = data2 in line_str2
        print(str_exist)
    except Exception as e:
        print(e)
395,70,90,45
convertArea = new
list index out of range
885,180,60,12
STDOUT = new
list index out of range
635,190,310,440
browser = new
['browser = new Fl_Browser(635,190,310,440,"STDOUT");']
True
895,95,50,30
comBtn = new
['comBtn = new Fl_Button(895,95,50,30,"結合");']
True
895,55,50,30
filBtn = new
['filBtn = new Fl_Button(895,55,50,30,"モザイク\\n作成");']
True
895,20,50,30
culcBtn = new
['culcBtn = new Fl_Button(895,20,50,30,"モザイク\\n追加");']
True

[Python] 348 Adobe XDのアイテムデータからJSONファイルを作成

[M1 Mac, Monterey 12.6.3, Python 3.10.4]

※この記事は”[JavaScript] Adobe XDのアイテムデータを取得するプラグイン作成”のPython編です

Adobe XDの自製プラグインで取得したアイテムデータからJSONファイルを作成しました。

これでアイテムの座標と幅・高さをコピー&ペーストしてC++コードを修正できます。

あとはJSONファイルをキーのアルファベット順でソートする位でしょうか。

時間があればC++コードの自動書き換えを検討します。

import json

with open("items.txt", "r") as tf:
    items_list = tf.read().replace("\n","").split(';')
    
# print(items_list)
# print(len(items_list))

# listからデータ抽出し、JSON文字列作成
json_str = ""
num = 0
for item in items_list:
    name = item.split("'")[1]
    print(name + "\n")
    
    xy = (item.split("global X,Y:")[1]).split("parent")[0]
    x = xy.split(",")[0]
    y = xy.split(",")[1]
    print(x + "\n")
    print(y + "\n")
    
    wh = (item.split("{")[1]).split("global")[0]
    w = (wh.split("width:")[1]).split(", height")[0]
    h = wh.split("height:")[1]
    print(w + "\n")
    print(h + "\n")
    
    if num == 0:
        json_str += "{\"" + name + "\"" + ":[" + x + ", " + y + ", " + w + ", " + h + "],\n"
    elif num < len(items_list) -1:
        json_str += "\"" + name + "\"" + ":[" + x + ", " + y + ", " + w + ", " + h + "],\n"
    else:
        json_str += "\"" + name + "\"" + ":[" + x + ", " + y + ", " + w + ", " + h + "]}"

    print(json_str + "\n")
    
    num += 1

# JSONファイル作成
file = open('items.json', mode='w')
file.write(json_str.replace(" ",""))
file.close()

[JavaScript] 15 Adobe XDのアイテムデータを取得するプラグイン作成 その3 テキスト出力

[M1 Mac, Monterey 12.6.3]

前回の続きです。

Pythonでは区切り文字付きテキストの方がリストのリテラル(機能のないただの文字列)より扱いやすいため、プラグインの内容を修正しました。

これでPythonスクリプトによりアイテムデータをリテラルのリストとして取得できます。あとは各要素から必要な数値を抽出してJSONに変換します。

JavaScriptの方は一応完成になります。

function myCommand(selection) {
    console.log(selection.items.length + " items are selected");

    let items_list = "";
    var num = 1;
    selection.items.forEach(function(value){
        // console.log(value);
        if (num < selection.items.length){
            items_list += value + ";";
        } else {
            items_list += value;
        }
        num += 1;
    });
    console.log(items_list);
}

module.exports = {
    commands: {
        GetItemXY: myCommand
    }
};
with open("items.txt", "r") as tf:
    items_list = tf.read().replace("\n","").split(';')
    
print(items_list)
print(len(items_list))

# ここからlistをJSONに変換する