[Python] AI 16 KerasによるMNISTの画像学習

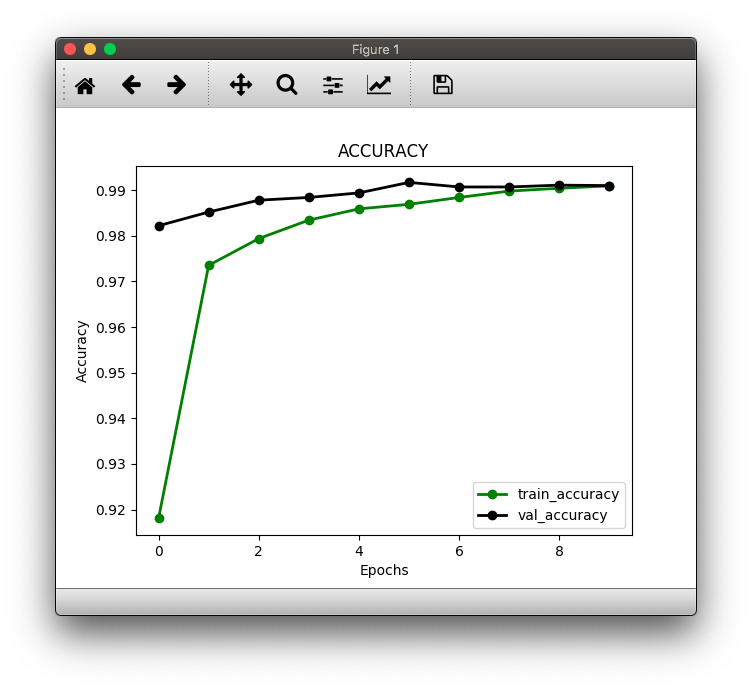
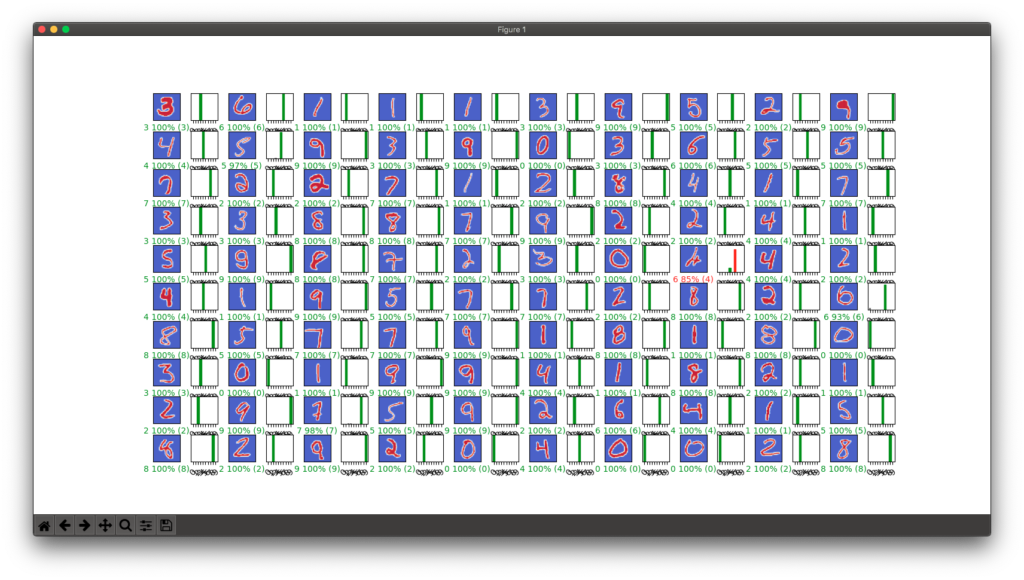
教本を参考にKerasで手書き数字画像認識の学習をさせてみました。私の条件では7回目の学習で正解率が99.1%に達しサチりました。

調べてみるとAIフレームワークのTOP3はTensorflow(Google)、PyTorch(Facebook)、Keras(Google系)らしく、それらの中でもTensorflowとPyTorchが抜けた存在だとか。日本産のChainerは開発元がPyTorchを採用・移行し、開発中断となっています。
import matplotlib.pyplot as plt
import numpy as np
import keras
from keras.datasets import mnist
from keras import backend as Keras
from keras.models import load_model

NUM_CLASSES = 10
IMG_ROWS, IMG_COLS = 28, 28

def plot_image(data_location, predictions_array, real_teacher_labels, dataset):
	predictions_array, real_teacher_labels, img = predictions_array[data_location], real_teacher_labels[data_location], dataset[data_location]
	plt.grid(False)
	plt.xticks([])
	plt.yticks([])

	plt.imshow(img,cmap="coolwarm")

	predicted_label = np.argmax(predictions_array)
	# 文字の色:正解は緑、不正解は赤
	if predicted_label == real_teacher_labels:
		color = 'green'
	else:
		color = 'red'
	
	plt.xlabel("{} {:2.0f}% ({})".format(handwritten_number_names[predicted_label],
								100*np.max(predictions_array),
								handwritten_number_names[real_teacher_labels]),
								color=color)

def plot_teacher_labels_graph(data_location, predictions_array, real_teacher_labels):
	predictions_array, real_teacher_labels = predictions_array[data_location], real_teacher_labels[data_location]
	plt.grid(False)
	plt.xticks([])
	plt.yticks([])

	thisplot = plt.bar(range(10), predictions_array, color="#666666")
	plt.ylim([0, 1]) 
	predicted_label = np.argmax(predictions_array)

	thisplot[predicted_label].set_color('red')
	thisplot[real_teacher_labels].set_color('green')

def convertOneHotVector2Integers(one_hot_vector):
	return [np.where(r==1)[0][0] for r in one_hot_vector]

## データの前処理
handwritten_number_names= [str(num) for num in range(0,10)]
# handwritten_number_names = ['0', '1', '2', '3', '4', '5', '6', '7', '8', '9'] # 教本では分かりやすく記述している
(train_data, train_teacher_labels), (test_data, test_teacher_labels) = mnist.load_data()

if Keras.image_data_format() == 'channels_first':
	train_data = train_data.reshape(train_data.shape[0], 1, IMG_ROWS, IMG_COLS)
	test_data = test_data.reshape(test_data.shape[0], 1, IMG_ROWS, IMG_COLS)
	input_shape = (1, IMG_ROWS, IMG_COLS)
else:
	train_data = train_data.reshape(train_data.shape[0], IMG_ROWS, IMG_COLS, 1)
	test_data = test_data.reshape(test_data.shape[0], IMG_ROWS, IMG_COLS, 1)
	input_shape = (IMG_ROWS, IMG_COLS, 1)

train_data = train_data.astype('float32')
test_data = test_data.astype('float32')
print(test_data)

train_data /= 255 # 今回は検証なのでtrain_dataは使いません
test_data /= 255

test_teacher_labels = keras.utils.to_categorical(test_teacher_labels, NUM_CLASSES)
## データの前処理 終了

# 学習モデルの読み込み
model = load_model('keras-mnist-model.h5')

# 予測実行
prediction_array = model.predict(test_data)

# 描画用検証データに変換
test_data = test_data.reshape(test_data.shape[0], IMG_ROWS, IMG_COLS)

# 100個のデータを予測(201-300)
NUM_ROWS = 10
NUM_COLS = 10
NUM_IMAGES = NUM_ROWS * NUM_COLS
START_LOC = 200

plt.figure(figsize=(2*NUM_COLS-4, 1*NUM_ROWS-2))
plt.subplots_adjust(wspace=0.4, hspace=0.4)
for i,num in enumerate(range(START_LOC,START_LOC + NUM_IMAGES)):
	plt.subplot(NUM_ROWS, 2*NUM_COLS, 2*i+1)
	plot_image(num, prediction_array,convertOneHotVector2Integers(test_teacher_labels), test_data)

	plt.subplot(NUM_ROWS, 2*NUM_COLS, 2*i+2)
	plot_teacher_labels_graph(num, prediction_array, convertOneHotVector2Integers(test_teacher_labels))
	_ = plt.xticks(range(10), handwritten_number_names, rotation=45)

plt.show()
[Python] AI 15 PyTorchによるMNISTとCIFER-10の画像学習

プログラムの構成自体はChainerと同じです。教本プログラムに使えるライブラリのバージョンは、torch 0.4.1, torchvision 0.2.2 でした

珍しくコードには問題はなかったですが、torchのバージョン調整に少し手間取りました。後で調べると教本に明記していました。
 1.5.1(文法違い) → 1.1.0(データセットなし) → 1.2.0(文法違い) → 0.4.1

CIFER-10のようなデータセットをベースにした学習モデルを使えば、ログインの際に画像を選んで認証をパスする作業を自動化できそうです。ただ正解率が9割を超えないと使い物にならないでしょう。

教本内で面白いリスト内包表記を見つけました。最初は意味がわかりませんでしたが、同じ数字を繰り返すといった内容です。個人的には長ったらしいので[0.]*10を使いますね。

# 教本
listA = list(0. for i in range(10))
# 他の表記
listA = [0. for i in range(10)]
listA = [0.]*10

print(listA)
--------------------------------------------------

出力
--------------------------------------------------
[0.0, 0.0, 0.0, 0.0, 0.0, 0.0, 0.0, 0.0, 0.0, 0.0]

[Python] AI 14 Chainerによる動物認識学習モデル 描画読み込み

マウスで描いた動物や指定した画像ファイルを判定させるところでつまずきました。

描画判定ではボタンを押しても反応がなく、画像判定では画像確定ボタンを押すとブラウザが500 Internal Server Errorになりました。

JavaScriptファイルやHTMLファイルをチェック、Chromeのコンソールを確認し、さらにDockerのBashを起動してコンテナ内部のファイルを確認するなどしました。

結局、jpg化した描画ファイルを保存するディレクトリが作られていないことが原因でした。たった2行の追加で解決です。ここで足止めを食らっている読者の方は結構いそうです。

初級者泣かせの教本で今回も大分時間を使いましたが、DockerやJavaScriptのスキルアップにつながりました。AIを学ぶというよりも間違い探しの様相を呈してきました。モチベーションを維持できるのであれば、それも良しです。

この教本が出版された2019年6月時点でのライブラリのバージョンを調査しましたので、Dockerfileを載せておきます。リリースが6月に近すぎるバージョンは避けて、やや古めを選んでいます。

UPLOAD_FOLDER = './images'
# 以下2行を追加
if not os.path.exists(UPLOAD_FOLDER):
    os.makedirs(UPLOAD_FOLDER)
FROM python:3.5-stretch

RUN mkdir -p /usr/src/app
ADD ./app /usr/src/app
RUN pip3 install --upgrade pip
RUN pip3 install requests==2.21.0
RUN pip3 install Flask==1.0.4
RUN pip3 install flask-cors==2.1.3
RUN pip3 install opencv-python==4.0.1.24
RUN pip3 install opencv-contrib-python==4.0.1.24
RUN pip3 install tensorflow==1.15
RUN pip3 install keras==2.2.4
RUN pip3 install chainer==5.0.0
RUN pip3 install Pillow==5.4.1
RUN apt-get update
RUN apt-get install -y libgl1-mesa-dev

WORKDIR /usr/src/app
EXPOSE 5000
RUN export FLASK_ENV=development

[Python] AI 13 Chainerによる動物認識学習モデル 読み込みと実行

[macOS Catalina 10.15.7]

pyenvのPython3.5環境でコードを走らせています。Dockerを使う手もありますが、個人開発者にはメリットが薄いのと時間的学習コストが掛かりそうなので今回は見送りです。

この種のモデルでGPUを使う場合はCUDA(CuPy)をそれ用に設定するのですが、NVIDIAによるサポートはmacOS High Sierra 10.13で終了しています。 したがってMojave 10.14以降ではGPUなしの設定のみ可能になるようです。

学習してモデルを保存するところは先を急ぐため省略します。

前回までの手書き数字認識学習モデルでは新しいChainer(7.8.0)でも問題なかったものの、このモデルでは5.0.0にダウングレードしないと動きませんでした。

また教本にはh5ファイルの保存方法について説明がありましたが、読み込み方法の説明は抜けていました。さらに調べる際、Kerasの学習ファイルと混同してしまったため、解決するのに時間が掛かりました

この教本にはpipでインストールしたライブラリのバージョンがほとんど載っていません。正に鮮度が命といった感じです。ネット記事でもそうですが、pip listも合わせて載せていただきたいものです。

chainer (5.0.0)
Keras (2.2.4)
Keras-Applications (1.0.8)
Keras-Preprocessing (1.1.2)
matplotlib (3.0.3)
numpy (1.18.5)
opencv-python (4.4.0.42)
Pillow (7.2.0)
pip (9.0.1)
PyQt5 (5.15.2)
PyQt5-sip (12.9.0)
tensorboard (1.15.0)
tensorflow (1.15.0)
tensorflow-estimator (1.15.1)
from PIL import Image
import numpy as np
import chainer
import chainer.functions as F
import chainer.links as L
from chainer import serializers,Chain
from chainer.cuda import to_cpu

INPUT_WIDTH = 128
INPUT_HEIGHT = 128

def data_reshape(width_height_channel_image):
    image_array = np.array(width_height_channel_image)
    return image_array.transpose(2, 0, 1)

def convert_test_data(image_file_path, size, show=False):
    
    image = Image.open(image_file_path)

    # 共通の画像のリサイズ
    result_image = image.resize((INPUT_WIDTH, INPUT_HEIGHT), Image.LANCZOS)

    # 画像データの再形成
    image = data_reshape(result_image)

    # 型をfloat32に変換
    result = image.astype(np.float32)
    result = model.xp.asarray(result)

    # モデルに渡すデータフォーマットに変換
    result = result[None, ...]

    return result

class CNN(Chain):
  def __init__(self):
    super(CNN, self).__init__()

    with self.init_scope():
      self.conv1 = L.Convolution2D(None, out_channels=32, ksize=3, stride=1, pad=1)
      self.conv2 = L.Convolution2D(in_channels=32, out_channels=64, ksize=3, stride=1, pad=1)
      self.conv3 = L.Convolution2D(in_channels=64, out_channels=128, ksize=3, stride=1, pad=1)
      self.conv4 = L.Convolution2D(in_channels=128, out_channels=256, ksize=3, stride=1, pad=1)
      self.layer1 = L.Linear(None, 1000)
      self.layer2 = L.Linear(1000, 2)
  
  def __call__(self, input):
    func = F.max_pooling_2d(F.relu(self.conv1(input)), ksize=2, stride=2)
    func = F.max_pooling_2d(F.relu(self.conv2(func)), ksize=2, stride=2)
    func = F.max_pooling_2d(F.relu(self.conv3(func)), ksize=2, stride=2)
    func = F.max_pooling_2d(F.relu(self.conv4(func)), ksize=2, stride=2)
    func = F.dropout(F.relu(self.layer1(func)), ratio=0.80)
    func = self.layer2(func)
    return func

if __name__ == '__main__':
    model = L.Classifier(CNN())
    serializers.load_hdf5("chainer-dogscats-model.h5", model)
    
    image_path = '1.jpg'
    Image.open(image_path)

    # 学習時と同じ画像のサイズに変換
    test_data= convert_test_data(test_image_url, (INPUT_WIDTH, INPUT_HEIGHT))

    with chainer.using_config('train', False), chainer.using_config(
                'enable_backprop', False):
        test_teacher_labels = model.predictor(test_data)
        test_teacher_labels = to_cpu(test_teacher_labels.array)
        test_teacher_label = test_teacher_labels.argmax(axis=1)[0]
        if test_teacher_label == 0:
            retval = '猫'
        else:
            retval = '犬'

    print(retval)

[Python] AI 12 Chainer + MNISTによる深層学習 Flaskベースアプリの導入 その3 Dockerfile

前回のDockerfileでdocker-composeファイルを走らせたところ、またエラーが発生しました。

調べてみるとTensorFlowはバージョン1を使っており、その場合PythonとKerasが新しいバージョンだと動かないということが判明しました。以下のようにDockerfileを修正しました。Pythonは元の3.5に戻しました。Kerasは2.3.1はNG、2.2.4でOKでした。

教本が発行された2019年6月時点では良書だったのかもしれませんが、2021年10月現在かなりのコードがライブラリの相性により、まともに動かなくなっています。こんなに早く風化するとは、AIの世界はシビアですね。先端技術ですから後方互換は考えないということでしょう。

2019年ならまだまだ新しいと思って購入したものの、のんびり楽しむどころかビシビシ鍛えられています。この本でプログラミング初心者が独習するのはちょっと厳しいかと思います。

FROM python:3.5-stretch

RUN mkdir -p /usr/src/app
ADD ./app /usr/src/app
RUN pip3 install --upgrade pip
RUN pip3 install requests
RUN pip3 install Flask
RUN pip3 install flask-cors
RUN pip3 install opencv-python
RUN pip3 install opencv-contrib-python
RUN pip3 install tensorflow==1.15
RUN pip3 install keras==2.2.4
RUN pip3 install chainer
RUN pip3 install Pillow
RUN apt-get update
RUN apt-get install -y libgl1-mesa-dev

WORKDIR /usr/src/app
EXPOSE 5000
RUN export FLASK_ENV=development
Chainer Dogs & Cats model is loaded.
Chainer MNIST model is loaded.
Model: "sequential_1"
_________________________________________________________________
Layer (type)                 Output Shape              Param #   
=================================================================
conv2d_1 (Conv2D)            (None, 26, 26, 32)        320       
_________________________________________________________________
conv2d_2 (Conv2D)            (None, 24, 24, 64)        18496     
_________________________________________________________________
max_pooling2d_1 (MaxPooling2 (None, 12, 12, 64)        0         
_________________________________________________________________
dropout_1 (Dropout)          (None, 12, 12, 64)        0         
_________________________________________________________________
flatten_1 (Flatten)          (None, 9216)              0         
_________________________________________________________________
dense_1 (Dense)              (None, 128)               1179776   
_________________________________________________________________
dropout_2 (Dropout)          (None, 128)               0         
_________________________________________________________________
dense_2 (Dense)              (None, 10)                1290      
=================================================================
Total params: 1,199,882
Trainable params: 1,199,882
Non-trainable params: 0
 _________________________________________________________________
Keras MNIST model is loaded.
TensorFlow Flower model is loaded.
* Serving Flask app "app" (lazy loading)
* Environment: production
WARNING: This is a development server. Do not use it in a production deployment.
Use a production WSGI server instead.
* Debug mode: off
* Running on http://0.0.0.0:5000/ (Press CTRL+C to quit)

[Python] AI 11 Chainer + MNISTによる深層学習 Flaskベースアプリの導入 その2

前回の続きです。

macOSではapt-getコマンドを使えないという理由でDockerの使用を一旦断念しましたが、DockerコンテナはDebianベースなのでDockerfileにコマンドを書き込めば良いということに気付きました。Dockerを扱い始めたばかりのド素人には少々難易度が高かったです。

そもそもが仮想環境の構築であってmacOSではないということを理解していませんでした

DockerfileのFROMをPython3.5から最新(3.9)に変更し、コマンドを3行追記しました。これで先に進むことができましたが、しばらくしてまたエラーになりました。

このエラーについては著者のGitHubに注意事項として記されていたので、適切に対処すればクリアできそうです。

思いがけずDockerに関するスキルアップができたのは収穫でした。

2021/10/5追記:Dockerfileを次回記事で更新しています。

FROM python:3

RUN mkdir -p /usr/src/app
ADD ./app /usr/src/app
RUN pip3 install --upgrade pip
RUN pip3 install requests
RUN pip3 install Flask
RUN pip3 install flask-cors
RUN pip3 install opencv-python
RUN pip3 install opencv-contrib-python
RUN pip3 install tensorflow
RUN pip3 install keras
RUN pip3 install chainer
RUN pip3 install Pillow
RUN apt-get update
RUN apt-get install -y libgl1-mesa-dev

WORKDIR /usr/src/app
EXPOSE 5000
RUN export FLASK_ENV=development

[Python] AI 10 Chainer + MNISTによる深層学習 Flaskベースアプリの導入

[macOS Catalina 10.15.7]

教本では次はRaspberry PiにFlaskベースの画像認識アプリを導入するといった内容になっています。

Raspberry PiがなくてもDockerを使えばMacにアプリを導入できるとのことでしたが、私の環境では不可でした。macOSでは使えないapt-getコマンドでライブラリを導入する必要が生じたためです。

今はPython3.9.5を使っているのですが、エラーメッセージによると何故かpython3.5のライブラリを探しているようです。pip.confの設定を変えて無理やり下記のパスにOpenCVを入れたものの、エラーは変わらずでした。

手元にRaspberry Piがないので次に進むことにします。

2021/10/5追記:apt-getコマンドはDockerコンテナのDebian環境で使うことが分かりました。仮想環境について理解できていませんでした。次回記事に詳細を記しています。

Traceback (most recent call last):
File "app.py", line 10, in <module>
   import cv2
File "/usr/local/lib/python3.5/site-packages/cv2/__init__.py", line 5, in <module>
   from .cv2 import *
ImportError: libGL.so.1: cannot open shared object file: No such file or directory
apt-get install libgl1-mesa-dev

[Python] AI 09 Chainer + MNISTによる深層学習 学習済モデルの使用

作成した学習モデルを使って検証を実施しました。

教本ではGoogle Colaboratoryに学習モデルを保存して使っていますが、私の場合はJupyter Notebookではなくpyenv環境のPythonなので、ローカルに学習モデルファイルを置いています。

検証用関数 testEpochを引数なしにするなど少し書き換えました。

import chainer
import chainer.links as L
import chainer.functions as F
from chainer import iterators
import numpy as np
from chainer.dataset import concat_examples
from chainer import serializers

class MLP(chainer.Chain):
    def __init__(self, number_hidden_units=1000, number_out_units=10):
        super(MLP, self).__init__()

        with self.init_scope():
            self.layer1=L.Linear(None, number_hidden_units)
            self.layer2=L.Linear(number_hidden_units, number_hidden_units)
            self.layer3=L.Linear(number_hidden_units, number_out_units)

    def __call__(self, input_data):
        result1 = F.relu(self.layer1(input_data))
        result2 = F.relu(self.layer2(result1))
        return self.layer3(result2)

def testEpoch():
    # 検証用誤差と精度
    test_losses = list()
    test_accuracies = list()
    i = 1
    while True:
        test_dataset = test_iterator.next()
        test_data, test_teacher_labels = concat_examples(test_dataset)

        # 検証データをモデルに渡す
        prediction_test = model(test_data)

        # 検証データに対して得られた予測値と正解を比較し損失を算出する
        loss_test = F.softmax_cross_entropy(prediction_test, test_teacher_labels)
        test_losses.append(loss_test.data)

        # 精度を計算する
        accuracy = F.accuracy(prediction_test, test_teacher_labels)
        test_accuracies.append(accuracy.data)

        print(f'{i}回目 検証損失:{np.mean(test_losses):.4f} 検証精度:{np.mean(test_accuracies):.2f}')

        if test_iterator.is_new_epoch:
            loss_and_acciracy = [np.mean(test_losses),np.mean(test_accuracies)]
            test_iterator.reset()
            print(loss_and_acciracy)
            print('\n', end='')
            break

        i = i + 1
    return loss_and_acciracy

train_data, test_data = chainer.datasets.get_mnist(withlabel=True, ndim=1)

model = MLP()
serializers.load_npz('chainer-mnist.model', model)

BATCH_SIZE = 100
test_iterator = iterators.SerialIterator(test_data, BATCH_SIZE,
repeat=False, shuffle=False)

loss_and_acciracy = testEpoch()
print(f'検証損失&検証精度 loss_and_acciracy {loss_and_acciracy}')

# 5000番目のデータを検証する
data_location = [5000]
predict_data, predict_lable = test_data[data_location]

plt.imshow(predict_data.reshape(28, 28), cmap='gray')
plt.show()
print(f'検証画像:{predict_lable[0]}')

predict_data = predict_data[None, ...]
predict = model(predict_data)
result= predict.array
print(result)

probable_label = result.argmax(axis=1)
print(f'予測結果:{probable_label[0]}')
--------------------------------------------------

出力(後半のみ)
--------------------------------------------------
検証損失&検証精度 loss_and_acciracy [0.25712144, 0.9276001]
検証画像:3
[[ 0.28669706 -2.4434075  -0.32302654  5.68949    -0.95883775  4.6307244
  -3.47152    -3.0863516   1.5918074  -1.1413323 ]]
予測結果:3

[Python] AI 08 Chainer + MNISTによる深層学習 学習成果のグラフ化

前回の続きです。

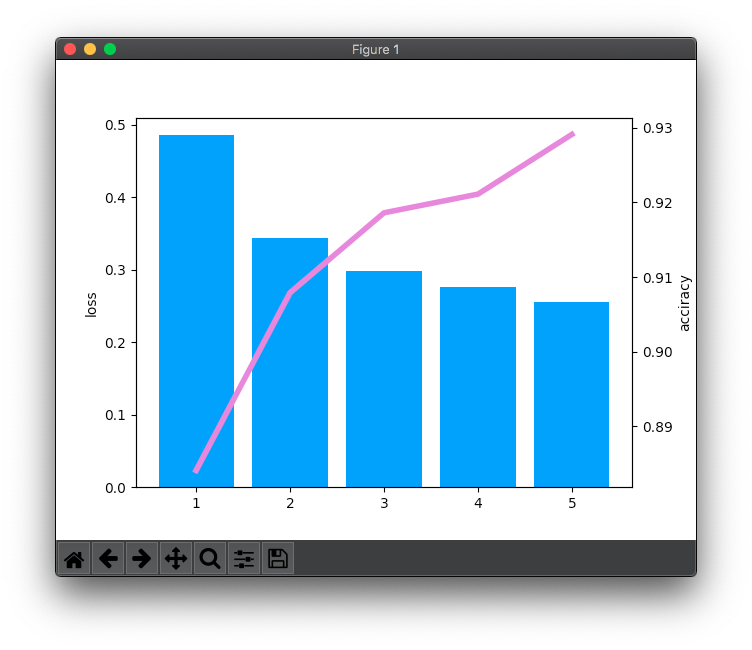
検証損失と検証精度の推移をグラフ化しました。

学習損失は学習データの難易度により上がったり下がったりですが、検証損失と検証精度は回を追うごとに確実に良くなっています。

Pythonで2軸グラフを初めて描きました。取りあえず描くだけならExcelより断然楽ですね。

import chainer
import chainer.links as L
import chainer.functions as F
from chainer import iterators
from chainer import optimizers
import numpy as np
import matplotlib.pyplot as plt
from chainer.dataset import concat_examples
from chainer import serializers

print(f'chainerバージョン {chainer.__version__}')

class MLP(chainer.Chain):
    def __init__(self, number_hidden_units=1000, number_out_units=10):
        super(MLP, self).__init__()

        with self.init_scope():
            self.layer1=L.Linear(None, number_hidden_units)
            self.layer2=L.Linear(number_hidden_units, number_hidden_units)
            self.layer3=L.Linear(number_hidden_units, number_out_units)

    def __call__(self, input_data):
        result1 = F.relu(self.layer1(input_data))
        result2 = F.relu(self.layer2(result1))
        return self.layer3(result2)

def testEpoch(train_iterator,loss,c):
    print(f'学習回数:{train_iterator.epoch:02d} --> 学習損失:{float(loss.data):.02f}')

    # 検証損失と精度
    test_losses = list()
    test_accuracies = list()
    i = 1
    while True:
        test_dataset = test_iterator.next()
        test_data, test_teacher_labels = concat_examples(test_dataset)

        # 検証データをモデルに渡す
        prediction_test = model(test_data)

        # 検証データに対して得られた予測値と正解を比較し損失を算出する
        loss_test = F.softmax_cross_entropy(prediction_test, test_teacher_labels)
        test_losses.append(loss_test.data)

        # 精度を計算する
        accuracy = F.accuracy(prediction_test, test_teacher_labels)
        test_accuracies.append(accuracy.data)

        print(f'{i}回目 検証損失:{np.mean(test_losses):.4f} 検証精度:{np.mean(test_accuracies):.2f}')

        if test_iterator.is_new_epoch:
            loss_and_acciracy = [c,np.mean(test_losses),np.mean(test_accuracies)]
            test_iterator.reset()
            print(loss_and_acciracy)
            print('\n', end='')
            break

        i = i + 1
    return loss_and_acciracy

train_data, test_data = chainer.datasets.get_mnist(withlabel=True, ndim=1)

model = MLP()

# print('入力層のバイアスパラメータ配列の形\n', model.layer1.b.shape)
# print('初期化後の値\n', model.layer1.b.data)

BATCH_SIZE = 100

train_iterator = iterators.SerialIterator(train_data, BATCH_SIZE)
test_iterator = iterators.SerialIterator(test_data, BATCH_SIZE,
repeat=False, shuffle=False)

optimizer = optimizers.SGD(lr=0.01)
optimizer.setup(model)

MAX_EPOCH = 5
c = 1
loss_list = list()
loss_and_acciracy = list()
while train_iterator.epoch < MAX_EPOCH:
    # 学習データセットをイテレータから取り出す
    train_dataset = train_iterator.next()

    # 学習データセットを学習データと正解データに分離する
    train_data, teacher_labels = concat_examples(train_dataset)

    # 予測値の計算をする
    prediction_train = model(train_data)

    # 得られた予測値と正解データと比較し学習損失を計算する
    loss = F.softmax_cross_entropy(prediction_train, teacher_labels)

    # ニューラルネットワークの中の勾配を初期化する
    model.cleargrads()

    # 勾配を計算する
    loss.backward()

    # 損失を反映してパラメータを更新する
    optimizer.update()

    # 一回学習(epoch)する度に検証データに対する予測精度を計る
    if train_iterator.is_new_epoch:
        loss_list.append(loss)
        print(loss_list)
        test_result = testEpoch(train_iterator,loss,c)
        loss_and_acciracy.append(test_result)
        c = c + 1

print(f'学習損失 loss_list {loss_list}')
print(f'検証損失&検証精度 loss_and_acciracy {loss_and_acciracy}')

# 2軸グラフの各データリスト作成
x_data = [data[0] for data in loss_and_acciracy]
bar_height_data = [data[1] for data in loss_and_acciracy]
line_height_data = [data[2] for data in loss_and_acciracy]

x = np.array(x_data)
bar_height = np.array(bar_height_data)
line_height = np.array(line_height_data)

# 棒グラフ(検証損失)を出力
fig, ax1 = plt.subplots()
ax1.bar(x, bar_height, align="center", color="#1e90ff", linewidth=0)
ax1.set_ylabel('loss')

# 折れ線グラフ(検証精度)を出力
ax2 = ax1.twinx()
ax2.plot(x, line_height, linewidth=4, color="#da70d6")
ax2.set_ylabel('acciracy')

plt.show()

# 学習済モデルを保存する
serializers.save_npz('chainer-mnist.model', model)
--------------------------------------------------

出力(最後の2行)
--------------------------------------------------
学習損失 loss_list [variable(0.6423535), variable(0.27920458), variable(0.25227988), variable(0.34563792), variable(0.2176703)]
検証損失&検証精度 loss_and_acciracy [[1, 0.48583707, 0.88409996], [2, 0.34386325, 0.9078999], [3, 0.29848826, 0.9186], [4, 0.27616385, 0.9211], [5, 0.25501966, 0.9291]]

[Python] AI 07 Chainer + MNISTによる深層学習

[macOS Catalina 10.15.7]

日本で開発されている深層学習フレームワークChainerと手書き数字データセットMNISTを使って深層学習してみました。

今回は学習モデルの作成・検証と保存です。

教本で使っているChainnerのバージョン5.0.0に対し、現在pipでダウンロードできる最新は7.8.0です。イテレータのリセット方法が違うので注意が必要です。

教本ではリセットする位置がprintの前になっていますが、後に持ってくるのが妥当かと思います。でないとエポックが切り替わる最後の検証結果が出力できません。

ここから中級になりますが、Pythonの文法的にも急に難易度が高くなる印象です。Chainerの過去バージョンを使いJupyter Notebookで単純になぞる分には問題ないものの、最新バージョンを使う場合はコードを修正する必要があるので脱落者が一気に増えそうな気がします。

import numpy as np
import matplotlib.pyplot as plt
import chainer
import chainer.links as L
import chainer.functions as F
from chainer import iterators
from chainer import optimizers
from chainer.dataset import concat_examples
from chainer import serializers

print(f'chainerバージョン {chainer.__version__}')

class MLP(chainer.Chain):
    def __init__(self, number_hidden_units=1000, number_out_units=10):
        super(MLP, self).__init__()

        with self.init_scope():
            self.layer1=L.Linear(None, number_hidden_units)
            self.layer2=L.Linear(number_hidden_units, number_hidden_units)
            self.layer3=L.Linear(number_hidden_units, number_out_units)

    def __call__(self, input_data):
        result1 = F.relu(self.layer1(input_data))
        result2 = F.relu(self.layer2(result1))
        return self.layer3(result2)

def testEpoch(train_iterator,loss):
    print(f'学習回数:{train_iterator.epoch:02d} --> 学習損失:{float(loss.data):.02f}')

    # 検証用損失と精度
    test_losses = []
    test_accuracies = []

    i = 1
    while True:
        test_dataset = test_iterator.next()
        test_data, test_teacher_labels = concat_examples(test_dataset)

        # 検証データをモデルに渡す
        prediction_test = model(test_data)

        # 検証データに対して得られた予測値と正解を比較し損失を算出する
        loss_test = F.softmax_cross_entropy(prediction_test, test_teacher_labels)
        test_losses.append(loss_test.data)

        # 精度を計算する
        accuracy = F.accuracy(prediction_test, test_teacher_labels)
        test_accuracies.append(accuracy.data)

        print(f'{i}回目 検証損失:{np.mean(test_losses):.4f} 検証精度:{np.mean(test_accuracies):.2f}')
        
        # Chainer7.8.0用にリセット方法を変更
        if test_iterator.is_new_epoch:
            print('\n',end='') # 1回だけ改行
            test_iterator.reset()
            break

        i = i + 1

train_data, test_data = chainer.datasets.get_mnist(withlabel=True, ndim=1)

model = MLP()

# print('入力層のバイアスパラメータ配列の形\n', model.layer1.b.shape)
# print('初期化後の値\n', model.layer1.b.data)

BATCH_SIZE = 100

train_iterator = iterators.SerialIterator(train_data, BATCH_SIZE)
test_iterator = iterators.SerialIterator(test_data, BATCH_SIZE,
repeat=False, shuffle=False)

optimizer = optimizers.SGD(lr=0.01)
optimizer.setup(model)

MAX_EPOCH = 5

loss_list = list()
while train_iterator.epoch < MAX_EPOCH:
    # 学習データセットをイテレータから取り出す
    train_dataset = train_iterator.next()

    # 学習データセットを学習データと正解データに分離する
    train_data, teacher_labels = concat_examples(train_dataset)

    # 予測値の計算をする
    prediction_train = model(train_data)

    # 得られた予測値と正解データと比較し学習損失を計算する
    loss = F.softmax_cross_entropy(prediction_train, teacher_labels)

    # ニューラルネットワークの中の勾配を初期化する
    model.cleargrads()

    # 勾配を計算する
    loss.backward()

    # 損失を反映してパラメータを更新する
    optimizer.update()

    # 一回学習(epoch)する度に検証データに対する予測精度を計る
    if train_iterator.is_new_epoch:
        loss_list.append(loss)
        print(loss_list)
        testEpoch(train_iterator,loss)

# 学習済モデルを保存する
serializers.save_npz('chainer-mnist.model', model)