[Python] 348 Adobe XDのアイテムデータからJSONファイルを作成

[M1 Mac, Monterey 12.6.3, Python 3.10.4]

※この記事は”[JavaScript] Adobe XDのアイテムデータを取得するプラグイン作成”のPython編です

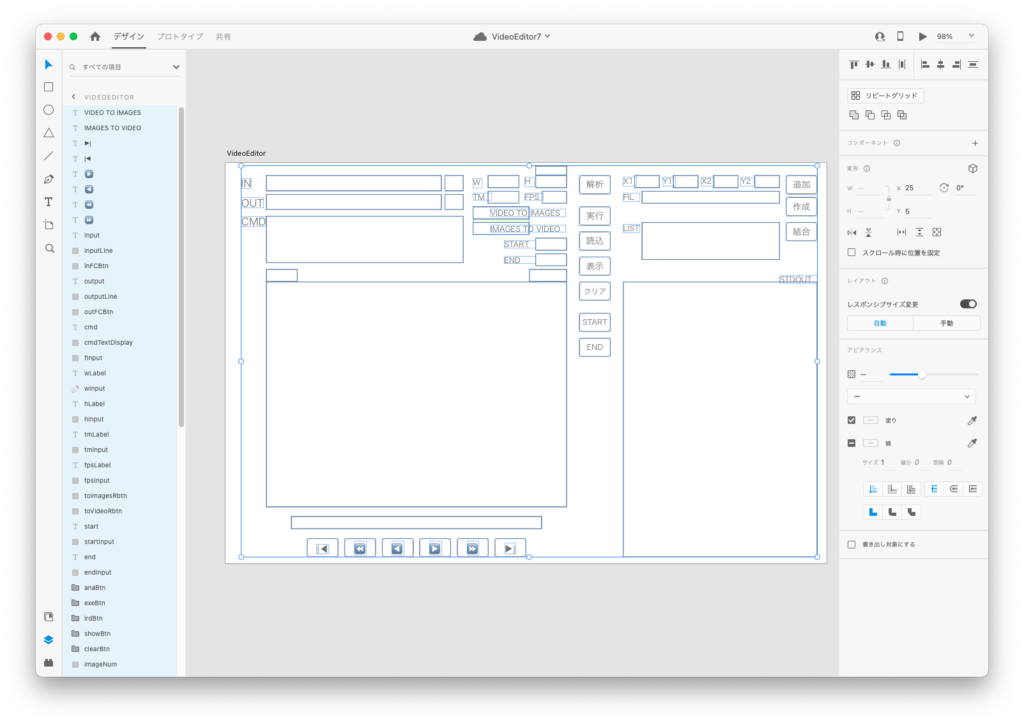
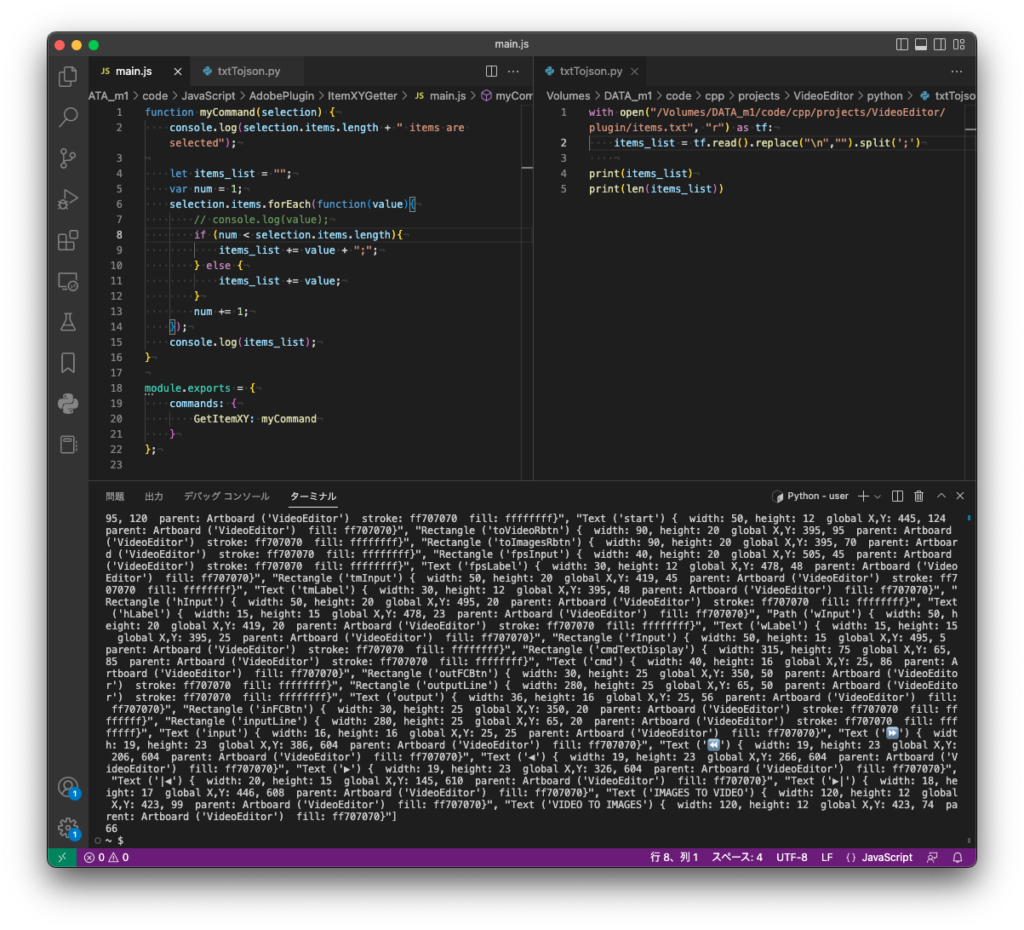
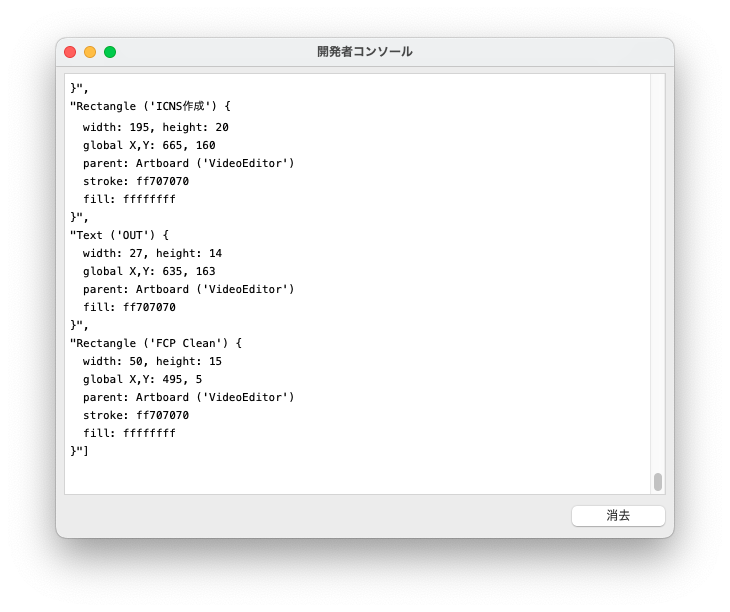
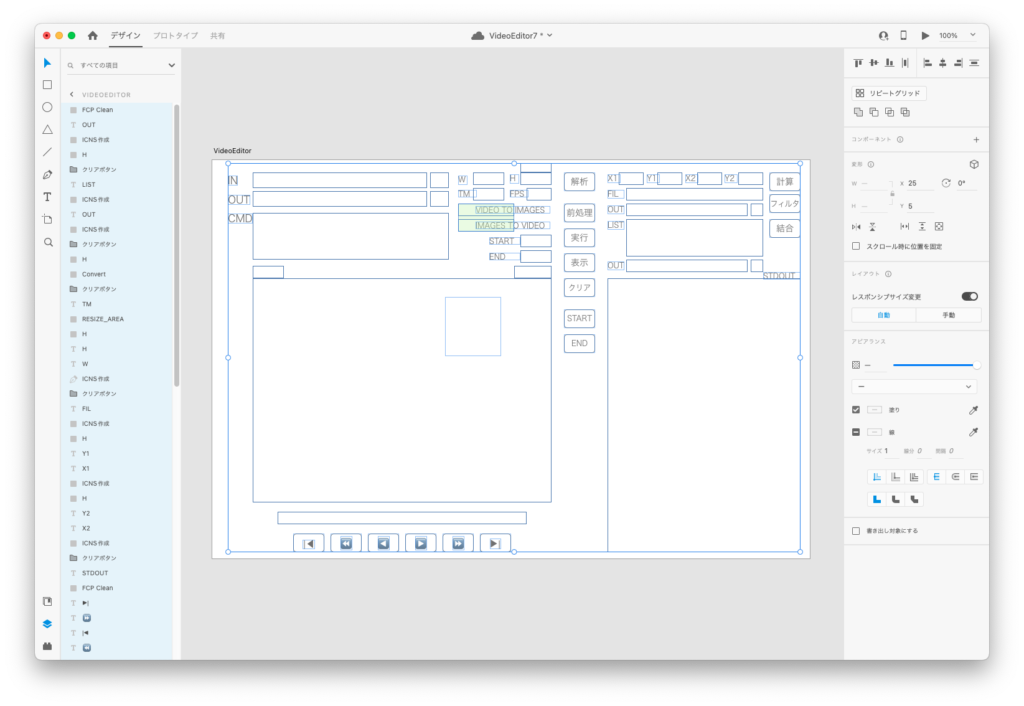
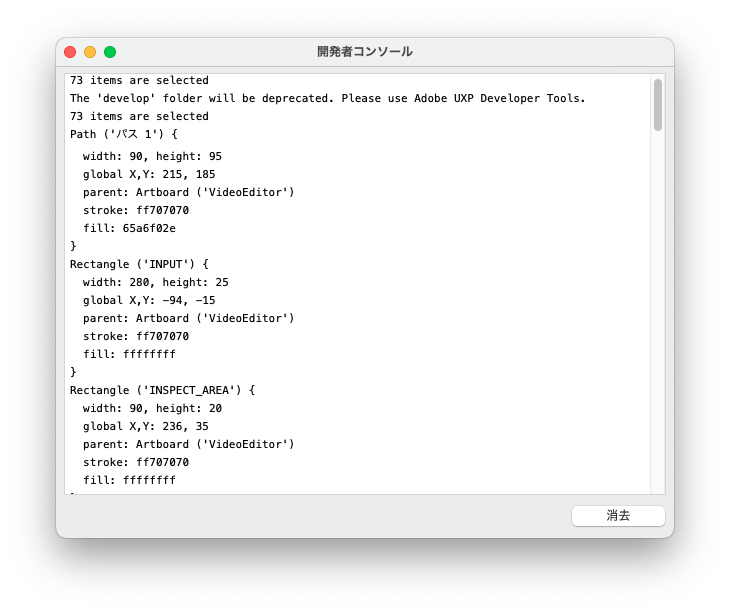
Adobe XDの自製プラグインで取得したアイテムデータからJSONファイルを作成しました。

これでアイテムの座標と幅・高さをコピー&ペーストしてC++コードを修正できます。

あとはJSONファイルをキーのアルファベット順でソートする位でしょうか。

時間があればC++コードの自動書き換えを検討します。

import json

with open("items.txt", "r") as tf:
    items_list = tf.read().replace("\n","").split(';')
    
# print(items_list)
# print(len(items_list))

# listからデータ抽出し、JSON文字列作成
json_str = ""
num = 0
for item in items_list:
    name = item.split("'")[1]
    print(name + "\n")
    
    xy = (item.split("global X,Y:")[1]).split("parent")[0]
    x = xy.split(",")[0]
    y = xy.split(",")[1]
    print(x + "\n")
    print(y + "\n")
    
    wh = (item.split("{")[1]).split("global")[0]
    w = (wh.split("width:")[1]).split(", height")[0]
    h = wh.split("height:")[1]
    print(w + "\n")
    print(h + "\n")
    
    if num == 0:
        json_str += "{\"" + name + "\"" + ":[" + x + ", " + y + ", " + w + ", " + h + "],\n"
    elif num < len(items_list) -1:
        json_str += "\"" + name + "\"" + ":[" + x + ", " + y + ", " + w + ", " + h + "],\n"
    else:
        json_str += "\"" + name + "\"" + ":[" + x + ", " + y + ", " + w + ", " + h + "]}"

    print(json_str + "\n")
    
    num += 1

# JSONファイル作成
file = open('items.json', mode='w')
file.write(json_str.replace(" ",""))
file.close()

[JavaScript] 15 Adobe XDのアイテムデータを取得するプラグイン作成 その3 テキスト出力

[M1 Mac, Monterey 12.6.3]

前回の続きです。

Pythonでは区切り文字付きテキストの方がリストのリテラル(機能のないただの文字列)より扱いやすいため、プラグインの内容を修正しました。

これでPythonスクリプトによりアイテムデータをリテラルのリストとして取得できます。あとは各要素から必要な数値を抽出してJSONに変換します。

JavaScriptの方は一応完成になります。

function myCommand(selection) {
    console.log(selection.items.length + " items are selected");

    let items_list = "";
    var num = 1;
    selection.items.forEach(function(value){
        // console.log(value);
        if (num < selection.items.length){
            items_list += value + ";";
        } else {
            items_list += value;
        }
        num += 1;
    });
    console.log(items_list);
}

module.exports = {
    commands: {
        GetItemXY: myCommand
    }
};
with open("items.txt", "r") as tf:
    items_list = tf.read().replace("\n","").split(';')
    
print(items_list)
print(len(items_list))

# ここからlistをJSONに変換する

[JavaScript] 14 Adobe XDのアイテムデータを取得するプラグイン作成 その2 リスト出力

[M1 Mac, Monterey 12.6.3]

Adobe XDのプラグインからアイテムデータをファイル出力するのは私の技量では難しいため早々にあきらめて、Python用のリストとして開発者コンソールに出力するようにしました。

これをPythonスクリプトにコピー&ペーストしてC++コードを書き換えようという算段です。

JavaScriptはローカル環境とのファイルのやり取りが不得手なところがあるので難しいことをやろうとせず、ここだけ手動でさっさとPythonに渡してしまうのが得策だと考えました。

アイテムデータをPython用リストとして出力
function myCommand(selection) {
    console.log(selection.items.length + " items are selected");

    let items_list = "";
    var num = 1;
    selection.items.forEach(function(value){
        // console.log(value);
        if (num == 1){
            items_list += "[\"" + value + "\",\n";
        } else if (num < selection.items.length){
            items_list += "\"" + value + "\",\n";
        } else {
            items_list += "\"" + value + "\"]\n";
        }
        num += 1;
    });
    console.log(items_list);
}

module.exports = {
    commands: {
        GetItemXY: myCommand
    }
};

[JavaScript] 13 Adobe XDのアイテムデータを取得するプラグイン作成 その1

[M1 Mac, Monterey 12.6.3]

ビデオ編集アプリのGUIデザインにはAdobe XDを使っています。

GUI内アイテムの座標と幅・高さをプラグインで取り出して、C++のコードを書き換えるところまで自動化しようとしています。

とりあえずAdobe XDのプラグイン開発環境を構築し、アイテムのデータ所在を確認するところまでは出来ました。スクリプト自体は簡単に書けたので拍子抜けでした。

これらをJSONファイルとして取り出し、PythonでJSON読込・コード書き換えができれば完成になります。

Adobe XD GUIデザイン
GUI内アイテムデータの出力
function myCommand(selection) {
    console.log(selection.items.length + " items are selected");

    selection.items.forEach(function(value){
        console.log(value);
    });
}

module.exports = {
    commands: {
        GetItemXY: myCommand
    }
};

[C++] 237 FLTK : マウスをドラッグして四角形を描く その3 フレーム描画 Fl_Box

[M1 Mac, Monterey 12.6.3, clang 13.0.0, FLTK 3.8.1, NO IDE]

FLTKのfl_frame関数でフレームを描くと残像が重なって使えなかったのですが、最新のフレームだけ表示すると正常になりました。

また前のコードでは拡げたエリアを縮小することはできませんでした。このコードでは伸縮自在です。

ただし複数のフレームを描くと直前のフレームが消えてしまうので、これを残す方法を考える必要があります。あくまで見た目の問題であって、フレームの座標自体は保存できるようになっています。

課題はありますが、かなり前進したと言えるでしょう。

#pragma once
#include <FLstd.h>
#include "cppstd.h"

class BoxXY : public Fl_Box {
    Fl_Input* inputFrame1;
    Fl_Input* inputFrame2;
    Fl_Input* inputFrame3;
    Fl_Input* inputFrame4;

    public:
        BoxXY(int x, int y, int width_input, int height_input, Fl_Input* input1,Fl_Input* input2, Fl_Input* input3,Fl_Input* input4);
        void draw();
    private:
        int handle(int);
};
#include "BoxXY.h"

extern Fl_Box *show_box;
int xx1, yy1, xx2, yy2, xx0, yy0;

BoxXY::BoxXY(int x, int y, int width_input, int height_input, Fl_Input* input1,Fl_Input* input2, Fl_Input* input3,Fl_Input* input4) : Fl_Box(FL_FLAT_BOX, x, y, width_input, height_input, "") 
{
    this->inputFrame1 = input1;
    this->inputFrame2 = input2;
    this->inputFrame3 = input3;
    this->inputFrame4 = input4;
}

void BoxXY::draw(){
    // 線の色(第1引数)はAからXの24段階グレースケール4値(top, left, bottom, rightの順)
    // 灰色線
    fl_frame("LLLL",xx1+65, yy1+190, xx0-xx1, yy0-yy1);
    // 白線
    // fl_frame("XXXX",xx1+65, yy1+190, xx0-xx1, yy0-yy1);
    // 黒線
    // fl_frame("AAAA",xx1+65, yy1+190, xx0-xx1, yy0-yy1);
}

int BoxXY::handle(int event){
    switch (event) {
        case FL_PUSH:{
            xx1 = Fl::event_x() - 65;
            yy1 = Fl::event_y() - 190;

            inputFrame1->value(to_string(xx1).c_str());
            inputFrame1->textsize(12);

            inputFrame2->value(to_string(yy1).c_str());
            inputFrame2->textsize(12);

            return 1;
        }
        case FL_RELEASE:{
            xx2 = Fl::event_x() - 65;
            yy2 = Fl::event_y() - 190;

            inputFrame3->value(to_string(xx2).c_str());
            inputFrame3->textsize(12);

            inputFrame4->value(to_string(yy2).c_str());
            inputFrame4->textsize(12);

            return 1;
        }
        case FL_DRAG:{
            xx0 = Fl::event_x() - 65;
            yy0 = Fl::event_y() - 190;

            inputFrame3->value(to_string(xx0).c_str());
            inputFrame3->textsize(12);

            inputFrame4->value(to_string(yy0).c_str());
            inputFrame4->textsize(12);

            show_box -> redraw(); // この行を追加
            this->redraw();

            return 1;
        }
        default:
            return Fl_Box::handle(event);
    }
}

[C++] 236 FLTK : マウスをドラッグして四角形を描く その2 図形の削除 Fl_Box

[M1 Mac, Monterey 12.6.3, clang 13.0.0, FLTK 3.8.1, NO IDE]

前回の続きです。

fl_draw_box関数で描いた図形はキャンバスに相当するFl_Boxをredrawすると削除できます。

四角形ではなくフレームを描く方法も試しましたが、残像が何個も重なるため実用には至りませんでした。

あとは図形を透過させれば出来上がりです。

clearBtn = new Fl_Button(565,190,50,30,"矩形\nクリア");
clearBtn->color(fl_rgb_color(112,128,144));
clearBtn->labelcolor(fl_rgb_color(208,207,207));
clearBtn->labelsize(12);
clearBtn->callback(clearCB);

--------------------------------------------------
void clearCB(Fl_Widget*, void*) {
    x1_input -> value(0);
    y1_input -> value(0);
    x2_input -> value(0);
    y2_input -> value(0);

    show_box -> redraw();
}

[C++] 235 FLTK : マウスをドラッグして四角形を描く その1 Fl_Box

[M1 Mac, Monterey 12.6.3, clang 13.0.0, FLTK 3.8.1, NO IDE]

動画にモザイクをかける範囲を指定する際、同時に四角形の枠が表示されるようにすると作業しやすくなります。

今のところ四角形自体は描けていますが、透明度が設定できないため描画した範囲の内容が隠れて全く見えません。

Fl_GL_Windowではアルファ値を設定できるようなのでそのうちテストしたいです。

記事とは関係ないですが、今日からMacOS Montereyを再度試しています。現時点の最新版はVentura 13.2です。

#pragma once
#include <FLstd.h>
#include "cppstd.h"
#include "Box.h"
#include <Line.h>

class BoxXY : public Fl_Box {
    Fl_Input* inputA1;
    Fl_Input* inputA2;
    Fl_Input* inputA3;
    Fl_Input* inputA4;

    public:
        BoxXY(int x, int y, int width_input, int height_input, Fl_Input* input1,Fl_Input* input2, Fl_Input* input3,Fl_Input* input4);
        void draw();
    private:
        int handle(int);
};
#include "BoxXY.h"

int xx1, yy1, xx2, yy2, xx0, yy0;

BoxXY::BoxXY(int x, int y, int width_input, int height_input, Fl_Input* input1,Fl_Input* input2, Fl_Input* input3,Fl_Input* input4) : Fl_Box(FL_FLAT_BOX, x, y, width_input, height_input, "") 
{
    this->inputA1 = input1;
    this->inputA2 = input2;
    this->inputA3 = input3;
    this->inputA4 = input4;
}

void BoxXY::draw(){
    fl_rectf(xx1+65, yy1+190, xx0-xx1, yy0-yy1, fl_rgb_color(255,250,240));

    // または
    // fl_draw_box(FL_FLAT_BOX, xx1+65, yy1+190, xx0-xx1, yy0-yy1, fl_rgb_color(255,250,240));

    // 以下の方法では残像が出る
    // fl_frame("XXXX",xx1+65, yy1+190, xx0-xx1, yy0-yy1);
    
}

int BoxXY::handle(int event){
    switch (event) {
        case FL_PUSH:{
            xx1 = Fl::event_x() - 65;
            yy1 = Fl::event_y() - 190;

            inputA1->value(to_string(xx1).c_str());
            inputA1->textsize(12);

            inputA2->value(to_string(yy1).c_str());
            inputA2->textsize(12);

            return 1;
        }
        case FL_RELEASE:{
            xx2 = Fl::event_x() - 65;
            yy2 = Fl::event_y() - 190;

            inputA3->value(to_string(xx2).c_str());
            inputA3->textsize(12);

            inputA4->value(to_string(yy2).c_str());
            inputA4->textsize(12);

            return 1;
        }
        case FL_DRAG:{
            xx0 = Fl::event_x() - 65;
            yy0 = Fl::event_y() - 190;

            inputA3->value(to_string(xx0).c_str());
            inputA3->textsize(12);

            inputA4->value(to_string(yy0).c_str());
            inputA4->textsize(12);

            this->redraw();

            return 1;
        }
        default:
            return Fl_Box::handle(event);
    }
}

[C++] 234 FLTK : vector不具合の回避

[M1 Mac, Big Sur 11.7.2, clang 13.0.0, FLTK 3.8.1, NO IDE]

ビデオ編集アプリがvector<string>の要素取得で不具合を起こしました。アプリの実行ファイルでは問題なく動作し、appファイルでおかしくなります。

以前よりこのアプリに限らずvectorがらみの不具合が頻発しており、仕方ないのでvectorを作成せず各要素を直接変数に代入しました。

今回はswitch文を使いましたが、array<string, 5>への代入&取得でも上手くいくと思います。

MacOSのレポートによるとlibc++.1.dylibあたりに問題があるようです。深追いはやめておきます。

このアプリで音声なし動画の分割、結合、複数箇所モザイク作成ができます。Final Cut Proは持っていますが、サクッと編集できるツールとして作りました。サイズは1.6MBでffmpegやffprobeファイルは含みません。

FFmpegのライセンスはLGPLですから、動的リンクであればソースコード非開示で頒布可能のようです。

FLTKではGUIの野暮ったさが拭えないので、頒布するならwxWidgetsで作り直しでしょうか。

いずれにせよこのアプリのGUIはまだまだ手入れが必要です。

string width_str, height_str, fps_str, time_str, frames_str;

void showData(string file){
    std::ifstream ifFile;
    string buffer;

    ifFile.open(file, std::ios::in);
    std::getline(ifFile, buffer);
    cout << "buffer: " << buffer << endl;

    // bufferを先頭からカンマで分割していく
    int first = 0;
    int last = buffer.find_first_of(",");

    int count = 0;
    while (first < buffer.size()) {
        string subStr(buffer, first, last - first);
        
        switch (count){
            case 0:
                width_str = subStr;
                break;
            case 1:
                height_str = subStr;
                break;
            case 2:
                fps_str = subStr;
                break;
            case 3:
                time_str = subStr;
                break;
            case 4:
                frames_str = subStr;
                break;
            default:
                break;
        }
        first = last + 1;
        last = buffer.find_first_of(",", first);
 
        if (last == string::npos) {
            last = buffer.size();
        }
        count += 1;
    }

<以下略>
MacOSレポート

[C++] 233 FLTK : ビデオ編集アプリの改良

[M1 Mac, Big Sur 11.7.2, clang 13.0.0, FLTK 3.8.1, NO IDE]

昨年2022年9月に作成したビデオツール統合アプリから、ビデオ編集機能(音声なし)を取り出して改良を試みます。

コードの内容を大分忘れていて思い出すのに少々時間がかかりました。

分離したアプリをMakefileで作成できるようになったので、これから改良に着手します。

[PHP] 13 ブラウザ起動と同時にDeveloper Toolsを開く Chrome, Firefox

[M1 Mac, Big Sur 11.7.2, PHP 8.2.1, MySQL 8.0.31, noFramework]

ブラウザ起動と同時にDeveloper Toolsを開くようにしました。

Firefoxは下側に開きます。後から右側に変えられるものの私には非常に使いにくいのでChromeに戻ってきました。

<?php
require_once ('../../composer/vendor/autoload.php');
use Facebook\WebDriver\Chrome\ChromeDriver;
use Facebook\WebDriver\Chrome\ChromeOptions;
use Facebook\WebDriver\WebDriverExpectedCondition;
use Facebook\WebDriver\WebDriverBy;
use Facebook\WebDriver\Remote\DesiredCapabilities;

# MySQLサーバ起動判定
exec('mysqladmin ping', $out, $ret);
$out_str = $out[0];
$out_str2 = sprintf("out_str: %s", $out_str);
echo $out_str2;

if(strpos($out[0],'alive') === false){
    exec('mysql.server start');
}else{
    print 'MySQLは起動しています';
    echo "\n";
}

# Webサーバ起動
exec('php -S localhost:8890 -t "/code/PHP/projects/02_mysql_searcher39" > /dev/null &');

# chromedriverのパス設定
$driverPath = realpath("/opt/homebrew/Caskroom/chromedriver/109.0.5414.74/chromedriver");
putenv("webdriver.chrome.driver=" . $driverPath);

# オプション指定
$options = new ChromeOptions();
$options->addArguments(['--width=400','--height=400','--auto-open-devtools-for-tabs']);

$caps = DesiredCapabilities::chrome();
$caps->setCapability(ChromeOptions::CAPABILITY, $options);

# Chromeを起動しphpスクリプトを実行
$driver = ChromeDriver::start($caps);
$driver->get('http://localhost:8890/input.php');

<以下略>
<?php
require_once ('../../composer/vendor/autoload.php');
use Facebook\WebDriver\Firefox\FirefoxDriver;
use Facebook\WebDriver\Firefox\FirefoxOptions;
use Facebook\WebDriver\WebDriverExpectedCondition;
use Facebook\WebDriver\WebDriverBy;
use Facebook\WebDriver\Remote\DesiredCapabilities;

# MySQLサーバ起動判定
exec('mysqladmin ping', $out, $ret);
$out_str = $out[0];
$out_str2 = sprintf("out_str: %s", $out_str);
echo $out_str2;

if(strpos($out[0],'alive') === false){
    exec('mysql.server start');
}else{
    print 'MySQLは起動しています';
    echo "\n";
}

# Webサーバ起動
exec('php -S localhost:8890 -t "/code/PHP/projects/02_mysql_searcher38" > /dev/null &');

# geckodriverのパス設定
putenv('webdriver.gecko.driver=/usr/local/bin/geckodriver');

# オプション設定
$desiredCapabilities = DesiredCapabilities::firefox();
$firefoxOptions = new FirefoxOptions();
$firefoxOptions->addArguments([ '--width=600','--height=400','-devtools']);
$desiredCapabilities->setCapability(FirefoxOptions::CAPABILITY, $firefoxOptions);

# Firefoxを起動しphpスクリプトを実行
$driver = FirefoxDriver::start($desiredCapabilities);
$driver->get('http://localhost:8890/input.php');

<以下略>