[Python]329 PyQt6 ボタン動作の実装

[M1 Mac, Big Sur 11.6.5, Python 3.10.0]

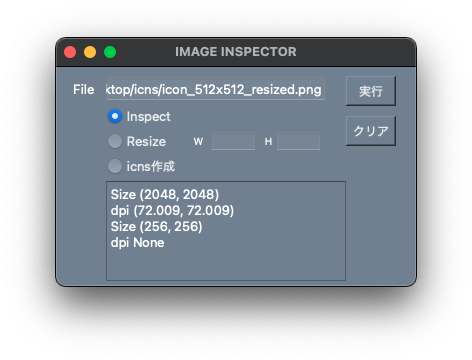
前回のコードにボタン動作を追加しPyQt6アプリを完成させました。icnsファイル作成箇所はクラスファイルとして別にしました。このアプリではドラッグ&ドロップでファイルパスを取得することもできます。

appファイルにすると260MBの巨大サイズになりました。さくっと作れますがやはりファイルの大きさが問題です。

アプリはとりあえず自サイトにアップしました。ここからC++の本家Qtに移植の予定です。

PyQt6はこれまで見てきたウィジェットツールキットの中では最も扱いやすかったです。並べると、PyQt6 > Swing >>> Tkinter >>FLTK といったところでしょうか。上位2つは企業開発であり、商品としてそれなりに洗練されているということでしょう。

FLTKは外観・文法・ウィジェットの名称など、クセが強すぎて開発意欲が低いままです。ラジオボタンがFl_Round_Button、ラベルがFl_Boxなどなどネーミングがピンとこなくて困っています。

2022/03/25追記
pngからjpgに変換しなくても解像度を上げられましたので後日コードをアップします。

https://www.tampiweb.site/?page_id=453
import sys
from PyQt6.QtWidgets import QLabel,QWidget,QApplication,QTextEdit,QLineEdit,QPushButton,QButtonGroup,QRadioButton
from PyQt6.QtCore import Qt
from pathlib import Path
from PIL import Image
import makeIcns

class ImageInspector(QWidget):
    def __init__(self):
        super().__init__()
        self.setWindowTitle("IMAGE INSPECTOR")
        self.setGeometry(100,100,360,220)
        self.setStyleSheet('background-color: #708090')
        self.setAcceptDrops(True)
        
        file = QLabel('File',self)
        file.setGeometry(15,15,26,16)
        file.setAlignment(Qt.AlignmentFlag.AlignCenter)
        
        self.input= QLineEdit('',self)
        self.input.setGeometry(50,10,220,25)
        self.input.setAcceptDrops(True)
        
        execution = QPushButton('実行',self)
        execution.setGeometry(290,10,50,30)
        execution.released.connect(self.execute)
        
        clear = QPushButton('クリア',self)
        clear.setGeometry(290,50,50,30)
        clear.released.connect(self.clear)
        
        self.rbtns = QButtonGroup()
        self.inspect = QRadioButton("Inspect",self)
        self.inspect.setGeometry(50,40,90,20)
        self.inspect.setChecked(True)
        self.rbtns.addButton(self.inspect)
        
        self.resize_img = QRadioButton("Resize",self)
        self.resize_img.setGeometry(50,65,90,20)
        self.rbtns.addButton(self.resize_img)
        
        width_label = QLabel('W',self)
        width_label.setGeometry(135,70,15,10)
        width_label.setAlignment(Qt.AlignmentFlag.AlignCenter)
        width_label.setStyleSheet('font-size:10px')
        
        self.width = QLineEdit('',self)
        self.width.setGeometry(155,65,45,20)
        
        height_label = QLabel('H',self)
        height_label.setGeometry(205,70,15,10)
        height_label.setAlignment(Qt.AlignmentFlag.AlignCenter)
        height_label.setStyleSheet('font-size:10px')
        
        self.height = QLineEdit('',self)
        self.height.setGeometry(220,65,45,20)
        
        self.icns = QRadioButton("icns作成",self)
        self.icns.setGeometry(50,90,90,20)
        self.icns.setToolTip('PNG file[2048*2048,72px] required')  
        self.rbtns.addButton(self.icns)
        
        self.output = QTextEdit('',self)
        self.output.setGeometry(50,115,240,100)
        self.output.setAcceptDrops(False)
        
    def dragEnterEvent(self, e):
        if(e.mimeData().hasUrls()):
            e.accept()

    def dropEvent(self, e):
        urls = e.mimeData().urls()
        path = Path(urls[0].toLocalFile())
        print(f"Drop_path {path}")
        self.input.setText(str(path))
        
    def execute(self):
        image_path = self.input.text()
        print(f"Exe_path {image_path}")
        img = Image.open(image_path)
        
        if self.inspect.isChecked():
            self.output.append("Size " + str(img.size) + "\n"+ "dpi " + str(img.info.get('dpi')))
        elif self.resize_img.isChecked():
            width = int(self.width.text())
            height = int(self.height.text())
            resize_img= img.resize((width,height))
            resize_img_path = ".".join(self.input.text().split(".")[:-1]) + "_resized." + (self.input.text()).split(".")[-1]
            print(f"Resize_path {resize_img_path}")
            resize_img.save(resize_img_path)
        else: # icns作成
            makeIcns.MakeIcns.make(None,image_path,self)
        
    def clear(self):
        self.input.clear()
from PIL import Image
import subprocess, os
from PyQt6.QtWidgets import QDialog,QPushButton,QLabel
from PyQt6.QtCore import Qt

class MakeIcns():
    def make(self, filepath0, window):
        img = Image.open(filepath0)
        print(str(img.size))
        if str(img.size)=="(2048, 2048)": # 2048*2048
            filepath0_jpg = ".".join(filepath0.split(".")[:-1]) + ".jpg" # 1024*1024 dpi=144
            filepath = ".".join(filepath0.split(".")[:-1]) + "1.png" # 1024*1024 dpi=144
            filepath2 = ".".join(filepath0.split(".")[:-1]) + "2.png" # 512*512 dpi=72
            filedir = "/".join(filepath0.split("/")[:-1]) + "/" + (filepath0.split("/")[-1]).split(".")[-2] + ".iconset/"
            
            print(f"filepath0_jpg {filepath0_jpg}")
            print(f"filepath {filepath}")
            print(f"filepath2 {filepath2}")
            print(f"filedir {filedir}")
            
            os.mkdir(filedir)

            img1 = Image.open(filepath0).convert("RGB")
            # 512*512 dpi=72
            img1_resize = img1.resize((512,512))
            img1_resize.save(filepath2)

            # dpi=144にするため一旦jpgへ変換
            img1_resize2 = img1.resize((1024,1024))
            img1_resize2.save(filepath0_jpg,dpi=(144,144))
            # jpgをpngへ変換
            img3 = Image.open(filepath0_jpg).convert("RGBA")
            img3.save(filepath,dpi=(144,144))

            pixels = [32, 64, 256, 512, 1024]
            pixels2 = [16, 32, 128, 256, 512]
            filepaths = ['icon_16x16@2x.png','icon_32x32@2x.png','icon_128x128@2x.png','icon_256x256@2x.png','icon_512x512@2x.png']
            filepaths2 = ['icon_16x16.png','icon_32x32.png','icon_128x128.png','icon_256x256.png','icon_512x512.png']

            # dpi=144の各種pngファイル作成
            for pixel,file in zip(pixels,filepaths):
                img = Image.open(filepath)
                img_resize = img.resize((pixel,pixel))
                img_resize.save(filedir + file)
                img.close()

            # dpi=72の各種pngファイル作成    
            for pixel,file in zip(pixels2,filepaths2):
                img = Image.open(filepath2)
                img_resize = img.resize((pixel,pixel))
                img_resize.save(filedir + file)
                img.close()

            # icnsファイル作成
            dir = "/".join(filepath0.split("/")[:-1])
            iconset = (filepath0.split("/")[-1]).split(".")[-2] + ".iconset"
            cmd = f'iconutil -c icns {iconset}'
            subprocess.run(cmd, cwd=dir,shell=True)
            
            os.remove(filepath0_jpg)
            os.remove(filepath)
            os.remove(filepath2)
        else:
            MakeIcns.showDialog(self,window)
            
    def showDialog(self,window):
        dlg = QDialog(window)
        dlg.setFixedSize(250,100)
        label = QLabel('This file is invalid.\nPNG file[2048*2048,72dpi] required',dlg)
        label.setAlignment(Qt.AlignmentFlag.AlignCenter)
        label.move(15,20)
        label.setStyleSheet('font-size:14px')
        btn = QPushButton("OK",dlg)
        btn.move(90,60)
        def action():
            dlg.close()
        btn.released.connect(action)
        dlg.setWindowTitle("Attention")
        dlg.exec()
[Python]328 PyQt6 UIデザインの実装

[M1 Mac, Big Sur 11.6.5, Python 3.10.0]

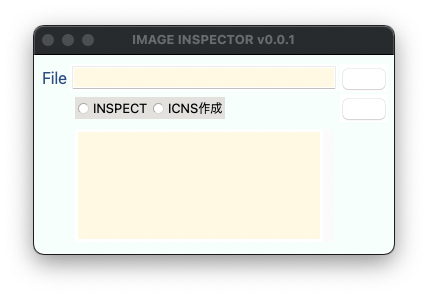
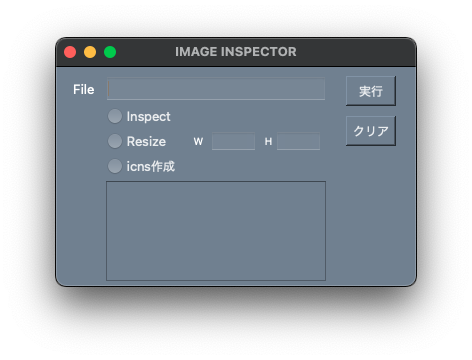
PyQt6ツールのUIデザインを実装しました。特に引っかかるところはなかったです。

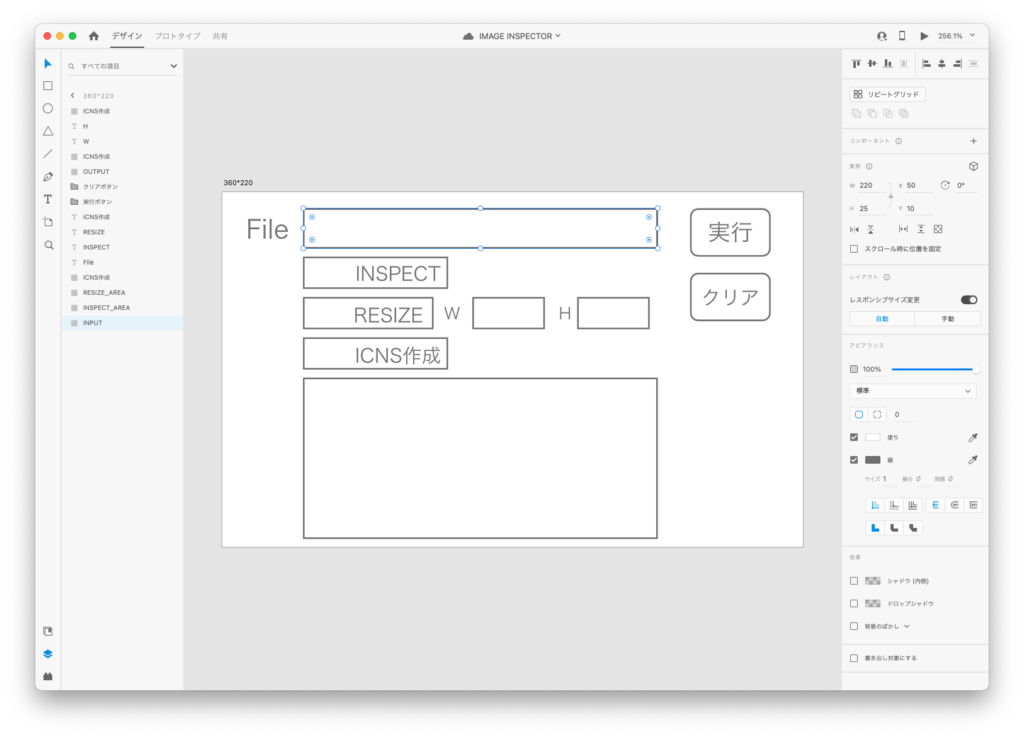
あらかじめAdobeXDなどで設計しておくと座標やサイズはコピーするだけでいいので楽です。

import sys
from PyQt6.QtWidgets import QLabel,QWidget,QApplication,QTextEdit,QLineEdit,QPushButton,QButtonGroup,QRadioButton
from PyQt6.QtCore import Qt

class ImageInspector(QWidget):
    def __init__(self):
        super().__init__()
        self.setWindowTitle("IMAGE INSPECTOR")
        self.setGeometry(100,100,360,220)
        self.setStyleSheet('background-color: #708090')
        
        file = QLabel('File',self)
        file.setGeometry(15,15,26,16)
        file.setAlignment(Qt.AlignmentFlag.AlignCenter)
        
        input = QLineEdit('',self)
        input.setGeometry(50,10,220,25)
        
        execution = QPushButton('実行',self)
        execution.setGeometry(290,10,50,30)
        
        clear = QPushButton('クリア',self)
        clear.setGeometry(290,50,50,30)
        
        self.rbtns = QButtonGroup()
        inspect = QRadioButton("Inspect",self)
        inspect.setGeometry(50,40,90,20)
        self.rbtns.addButton(inspect)
        
        resize = QRadioButton("Resize",self)
        resize.setGeometry(50,65,90,20)
        self.rbtns.addButton(resize)
        
        width_label = QLabel('W',self)
        width_label.setGeometry(135,70,15,10)
        width_label.setAlignment(Qt.AlignmentFlag.AlignCenter)
        width_label.setStyleSheet('font-size:10px')
        
        width = QLineEdit('',self)
        width.setGeometry(155,65,45,20)
        
        height_label = QLabel('H',self)
        height_label.setGeometry(205,70,15,10)
        height_label.setAlignment(Qt.AlignmentFlag.AlignCenter)
        height_label.setStyleSheet('font-size:10px')
        
        height = QLineEdit('',self)
        height.setGeometry(220,65,45,20)
        
        icns = QRadioButton("icns作成",self)
        icns.setGeometry(50,90,90,20)
        self.rbtns.addButton(icns)
        
        output = QTextEdit('',self)
        output.setGeometry(50,115,220,100)

app = QApplication(sys.argv)
window = ImageInspector()
window.show()
app.exec()

[Python]327 appファイルのApple公証

[M1 Mac, Big Sur 11.6.5, Python 3.10.0]

py2appにより作成したappファイルをAppleに提出しApple公証をパスさせました。

appファイルはインタプリタやPyQtを丸ごとパッケージにしているので中にあるプログラムに署名する必要があります。今回は268個のファイルに署名しました。

署名対象ファイルはappファイル作成時にログ出力されるsignリストで確認できます。このリストを取り出して以下のコードで一括署名しました。

これでGUIのXCodeでは扱っていないJava, C++, PythonアプリのApple公証を成功させたことになります。

次の目標はC++とPythonアプリのMicrosoft Storeアプリ登録(コマンドでappxファイル作成)ですが、ハードルはかなり高そうです。特に多言語対応に不安があります。xmlが使えるのであれば問題ないのですが。

import subprocess

signs = [ログ出力から取得したファイルパス + Contents/MacOS内実行ファイル]

for sign in signs:
    cmd = f'codesign --force --verify --verbose --sign [mac-signing-key-user-name] {sign} --deep --options runtime --entitlements entitlements.plist --timestamp'
    subprocess.run(cmd,shell=True)

[Python]326 Pythonスクリプトのappファイル化

[M1 Mac, Big Sur 11.6.5, Python 3.10.0]

PythonスクリプトをappファイルにするMakefileを作成しました。あらかじめpy2appをpipでインストールしておきます。今回はPyQt6のGUIアプリで試してみました。

サイズがかなり大きくなるので実際に配布するのは厳しいでしょうか。Windowを表示させるだけのコードが200MBにもなりました。

こうなってくると最初からJavaのSwingなどで書く方がいいような気もします。

# コマンド設定
GENERATOR = py2applet
GENERATOR2 = python

# ファイル設定
SOURCE = test.py
SETUP = setup.py
TARGET = test.app

# ディレクトリ設定
BUILDDIR = build
DISTDIR = dist

# appファイル作成
$(TARGET):
	$(GENERATOR) --make-setup $(SOURCE)
	$(GENERATOR2) $(SETUP) py2app

# リセット&実行
all: clean $(TARGET)

# ファイル&ディレクトリ削除
clean:
	rm -rf $(BUILDDIR) $(DISTDIR) $(SETUP)

[Python]325 icnsファイルの作成 改良版

[M1 Mac, Big Sur 11.6.5]

2048*2048, dpi=72のpngファイルからicnsファイルを一発作成できるようにしました。手作業の時に比べたらかなりの省力化になります。

昨日の段階ではプログラムでpngの解像度を上げる方法がわかりませんでしたが、一旦jpgに変換するとdpiを72から144に上げることができました。

せっかくなのでTkinterでGUIアプリにしようとしましたが、相変わらずApple Siliconに対応できておらずButtonが真っ白のままです。PyQt5はHomebrewでインストールできたもののimportエラーになりました。PyQt5ディレクトリの中を確認するとほぼ空でした。Apple Siliconには非対応なのでインストールが中断していたのでしょう。

PyQt6をwhlファイルでインストールするとテストコードが正常に走りました。これでしばらく遊んでみます。なおGPLライセンス版なのでアプリ配布の際はコード開示請求に応える義務があります。

2022/03/25追記
pngからjpgに変換しなくても解像度を上げられましたので後日コードをアップします。

from PIL import Image
import subprocess

filepath0 = 'test0.png' # 2048*2048 dpi=72
filepath0_jpg = 'test.jpg' # 1024*1024 dpi=144
filepath = 'test.png' # 1024*1024 dpi=144
filepath2 = 'test2.png' # 512*512 dpi=72
filedir = '/test/test.iconset/'

img1 = Image.open(filepath0).convert("RGB")
# 512*512 dpi=72
img1_resize = img1.resize((512,512))
img1_resize.save(filepath2)

# dpi=144にするため一旦jpgへ変換
img1_resize2 = img1.resize((1024,1024))
img1_resize2.save(filepath0_jpg,dpi=(144,144))
# jpgをpngへ変換
img3 = Image.open(filepath0_jpg).convert("RGBA")
img3.save(filepath,dpi=(144,144))

pixels = [32, 64, 256, 512, 1024]
pixels2 = [16, 32, 64, 256, 512]
filepaths = ['icon_16x16@2x.png','icon_32x32@2x.png','icon_128x128@2x.png','icon_256x256@2x.png','icon_512x512@2x.png']
filepaths2 = ['icon_16x16.png','icon_32x32.png','icon_128x128.png','icon_256x256.png','icon_512x512.png']

# dpi=144の各種pngファイル作成
for pixel,file in zip(pixels,filepaths):
    img = Image.open(filepath)
    img_resize = img.resize((pixel,pixel))
    img_resize.save(filedir + file)
    img.close()

# dpi=72の各種pngファイル作成    
for pixel,file in zip(pixels2,filepaths2):
    img = Image.open(filepath2)
    img_resize = img.resize((pixel,pixel))
    img_resize.save(filedir + file)
    img.close()

# icnsファイル作成
cmd = 'iconutil -c icns test.iconset'
subprocess.run(cmd, cwd=r"/test",shell=True)
Button表示不良のため開発中断(Tkinter)

[Python]324 kindle本のpngファイル化

[M1 Mac, Big Sur 11.6.5]

kindle本の画集を壁紙にするためPythonでpngファイル化しました。結合したらpdfファイルにできそうです。

import pyautogui
import time

# ページ数
page = 100
# スクショ撮影間隔(秒)
span = 1
# 出力ファイル
filedir = "/Users/[ユーザ名]/Desktop/Manet"
file_prefix = "Manet"

# 10秒待機(この間にkindleをフルスクリーン表示させる)
time.sleep(10)

# スクショ撮影
for p in range(page):
    # 出力ファイル名(プレフィックス_3桁ゼロ埋め連番.png)
    filename = file_prefix + "_" + str(p + 1).zfill(3) + '.png'
    # 画面全体スクリーンショット
    s = pyautogui.screenshot()
    # png保存
    s.save(filedir + "/" + filename)
    # ページ送り(通常は左右)
    pyautogui.press('down')
    # 1秒待機
    time.sleep(span)

[Python]323 icnsファイルの作成

[M1 Mac, Big Sur 11.6.5]

MacOSアプリ用アイコンを作成する機会が増えたのでicnsファイル作成コードを書きました。あらかじめ2つのpngファイルを用意すればあとは自動的にicnsファイルを作成してくれます。

最初のpngファイル2つはプレビューアプリのサイズ調整機能で簡単に作れます。大元のファイルは2048*2048, dpi=72です。

from PIL import Image
import subprocess

filepath = 'test.png' # 1024*1024 dpi=144
filepath2 = 'test2.png' # 512*512 dpi=72
filedir = '/test/test.iconset/'
pixels = [32, 64, 256, 512, 1024]
pixels2 = [16, 32, 64, 256, 512]
filenames = ['icon_16x16@2x.png','icon_32x32@2x.png','icon_128x128@2x.png','icon_256x256@2x.png','icon_512x512@2x.png']
filenames2 = ['icon_16x16.png','icon_32x32.png','icon_128x128.png','icon_256x256.png','icon_512x512.png']

# dpi=144の各種pngファイル作成
for pixel,file in zip(pixels,filenames):
    img = Image.open(filepath)
    img_resize = img.resize((pixel,pixel))
    img_resize.save(filedir + file)
    img.close()

# dpi=72の各種pngファイル作成    
for pixel,file in zip(pixels2,filenames2):
    img = Image.open(filepath2)
    img_resize = img.resize((pixel,pixel))
    img_resize.save(filedir + file)
    img.close()

# icnsファイル作成
cmd = 'iconutil -c icns test.iconset'
subprocess.run(cmd, cwd=r"/test",shell=True)

[Python] 322 ファイルの文字コードを一括変換

[Mac mini M1(2020), macOS Big Sur 11.6.1, Python 3.10.0]

Javaに関する基本的な知識を整理するため、”オラクル認定資格教科書 Javaプログラマ Silver SE11″を購入しました。Amazonセール半額の2090円だったので思わずポチりました。

例によってサンプルコードの文字コードがShift-JISのため、Macで読めるようUTF-8に一括変換しました。

まずサンプルコードのフォルダをコピーしフォルダ名を変更。自製アプリでディレクトリ構造を残したままファイルを全消去しました。そして以下の一括変換コードを実行しました。

ちなみにファイルを消さずに上書きになるようnkfコマンドを実行すると0バイトの空ファイルになります。

UTF-8からShift-JISへ変換する場合のコマンドは”nkf -s”になります。nkfはコマンド”brew install nkf”で前もってインストールしておきます。

JavaでしたらPathオブジェクトを文字列に変換する必要があるのですが、Pythonは不要なのでとても楽ですね。動的型付けのいいところです。

昨年9月に書いた変換先のフォルダ作成を含めたコードをよりシンプルにしました。

import glob,subprocess

dir = "/JavaSilver_samplecode"
paths_sjis = glob.glob(dir + "/**/*.java", recursive=True)

print(paths_sjis)

# 変換ファイルパス作成(フォルダ名を変更しファイル名はそのまま)
paths_utf8 = list()
for path in paths_sjis:
    path_utf8 = path.replace("JavaSilver_samplecode","JavaSilver_samplecode_utf8")
    paths_utf8.append(path_utf8)
    
print(paths_utf8)

for a,b in zip(paths_sjis,paths_utf8):
    cmd = "nkf -w %s > %s" %(a,b)
    subprocess.call(cmd, shell=True)

[Python] 321 M1 Macへのlxml非公式インストール

[M1 Mac mini 2020 , macOS Big Sur 11.6.1]

lxmlのサイトを参考にM1 Macに非公式インストールしてみました。今のところpipコマンドではlxmlをインストールできません。miniforgeのcondaコマンドで可能です。

サイトにあったMac OS Xへのインストール方法をBig Surで試したところ、たまたま上手くいきました。

手順は以下の通りです。

1.lxml.tgzの最新版をダウンロードする。今回はver.4.6.3。

2. tgzファイルを解凍する。

3.lxml4.6.3ディレクトリをカレントディレクトリにする。

4.lxmlをsetup.pyでビルドする。ビルドが途中で終わっても先に進んで問題ありませんでした。あくまでもpandas.read_htmlの使用に限定しての話ですが。

python setup.py build --static-deps

5.lxmlをインストールする。

python setup.py install

lxml開発元はmacOSの開発環境を古いと断じており、サポートに消極的な様子が伺えました。とりあえずインストールはできたので良しとします。ビルド環境が用意されていて助かりました。

これでminiforgeに頼らずに私のpyenv環境をM1 Macにて再現できました。

[Python] 320 pandasの行名設定 index関連メソッド

データフレームの行名を設定するメソッドをまとめました。

データフレームに空白の行を挿入するコードは以下のようになります。set_index、reindex、reset_indexメソッドを駆使します。このコードによりどの分類が欠けていても処理後にAからEの全分類が明示されるようになります。

なおreindexメソッドでaxis=1にすると列名に対応します。

df2のNaNを0に置き換えないとうまくいかず、泥臭い実務的なコードになりました。この処理をしないとdf4で分類Cの行が消えてしまいます。df2からdf3は何も変わっていないように見えますが、分類Cの行に実体が入っているためreset_index処理で消えることはありません。

import pandas as pd

df = pd.read_excel('test.xlsx',sheet_name=0)
print(f"df:\n{df}\n")

df.set_index('分類',inplace=True)
print(f"dfインデックス設定後:\n{df}\n")

labels = ['A','B','C','D','E']
df2 = df.reindex(labels, axis=0)
print(f"df2:\n{df2}\n")

# 空データの分類Cを残すための処理
df3 = df2.replace({'NaN':0})
print(f"df3:\n{df3}\n")

df4 = df3.reset_index()
print(f"df4:\n{df4}\n")
--------------------------------------------------

出力
--------------------------------------------------
df:
  分類  評価額  取得額   損益
0  A  110  100   10
1  B  150  100   50
2  D  200  100  100
3  E  120  100   20

dfインデックス設定後:
    評価額  取得額   損益
分類               
A   110  100   10
B   150  100   50
D   200  100  100
E   120  100   20

df2:
      評価額    取得額     損益
分類                     
A   110.0  100.0   10.0
B   150.0  100.0   50.0
C     NaN    NaN    NaN
D   200.0  100.0  100.0
E   120.0  100.0   20.0

df3:
      評価額    取得額     損益
分類                     
A   110.0  100.0   10.0
B   150.0  100.0   50.0
C     NaN    NaN    NaN
D   200.0  100.0  100.0
E   120.0  100.0   20.0

df4:
  分類    評価額    取得額     損益
0  A  110.0  100.0   10.0
1  B  150.0  100.0   50.0
2  C    NaN    NaN    NaN
3  D  200.0  100.0  100.0
4  E  120.0  100.0   20.0