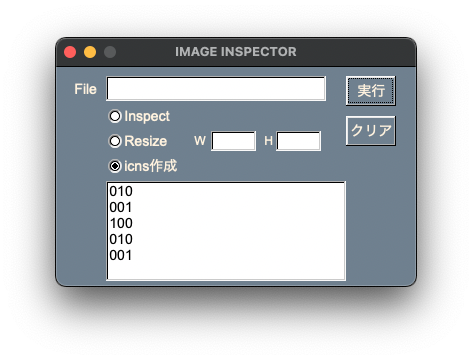
とりあえずヘッダファイルは書かずにソースファイルだけで簡単なCallbackができるようにしました。下記コードでは実行ボタンを押すとラジオボタン3個のbool値がFl_Multiline_Outputに出力されます。
あとFl_Multiline_Outputへの追加出力がaddやappendでは出来ません。該当するメンバ関数がなかなか見つかりませんでした。Fl_Input_という目立たない上位クラスにinsertを見つけた時は若干イラッとしました。
ユーザーが発信しているネット情報は今回の内容についてはほぼ皆無でした。ドキュメントやソースコード、公式サイト、開発当事者のサンプルコード公開サイトなどを参考に自力での解決が求められます。どうしても困ったら公式サイトの掲示板に投稿するのもありでしょう。
#include <FL/Fl.H>
#include <FL/Fl_Window.H>
#include <FL/Fl_Tabs.H>
#include <FL/Fl_Button.H>
#include <FL/Fl_Widget.H>
#include <FL/Fl_Tooltip.H>
#include <FL/Fl_Box.H>
#include <FL/Fl_Input.H>
#include <FL/Fl_Round_Button.H>
#include <FL/Fl_Radio_Round_Button.H>
#include <FL/Fl_Hor_Slider.H>
#include <FL/Fl_Multiline_Output.H>
#include "FL/Enumerations.H"
Fl_Window *window;
Fl_Box *file;
Fl_Input *input;
Fl_Group *radio_btns;
Fl_Multiline_Output *output;
Fl_Radio_Round_Button *inspect;
Fl_Radio_Round_Button *resize;
Fl_Radio_Round_Button *icns;
Fl_Box *width_label;
Fl_Input *width;
Fl_Box *height_label;
Fl_Input *height;
Fl_Button *execution;
Fl_Button *clear;
int onoff_inspect;
int onoff_resize;
int onoff_icns;
void execute(void){
onoff_inspect = inspect->value();
onoff_resize = resize->value();
onoff_icns = icns->value();
std::string tmp = std::to_string(onoff_inspect);
char const *num_char = tmp.c_str();
std::string tmp2 = std::to_string(onoff_resize);
char const *num_char2 = tmp2.c_str();
std::string tmp3 = std::to_string(onoff_icns);
char const *num_char3 = tmp3.c_str();
output->insert(num_char);
output->insert(num_char2);
output->insert(num_char3);
output->insert("\n");
}
void test(Fl_Widget*,void*) {
execute();
}
int main(int argc, char **argv) {
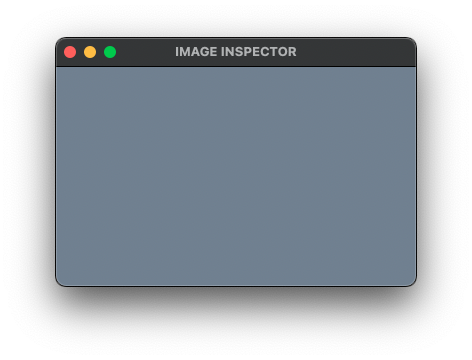
window = new Fl_Window(100,100,360,220,"IMAGE INSPECTOR");
window->color(fl_rgb_color(112,128,144));
// file
file = new Fl_Box(15,15,35,16,"File");
file->labelsize(14);
file->labelcolor(fl_rgb_color(255,239,213));
file->align(Fl_Align(FL_ALIGN_INSIDE|FL_ALIGN_LEFT));
input = new Fl_Input(50,10,220,25,"");
radio_btns = new Fl_Group(50,40,90,70,"");{
radio_btns->labelsize(12);
// Inspect
inspect = new Fl_Radio_Round_Button(50,40,90,20,"Inspect");
inspect->labelcolor(fl_rgb_color(255,239,213));
inspect->setonly();
// Resize
resize = new Fl_Radio_Round_Button(50,65,90,20,"Resize");
resize->labelcolor(fl_rgb_color(255,239,213));
// icns作成
icns = new Fl_Radio_Round_Button(50,90,90,20,"icns作成");
icns->labelcolor(fl_rgb_color(255,239,213));
}
radio_btns->end();
width_label = new Fl_Box(135,70,15,10,"W");
width_label->labelsize(12);
width_label->labelcolor(fl_rgb_color(255,239,213));
width_label->align(Fl_Align(FL_ALIGN_INSIDE|FL_ALIGN_LEFT));
width = new Fl_Input(155,65,45,20,"");
height_label = new Fl_Box(205,70,15,10,"H");
height_label->labelcolor(fl_rgb_color(255,239,213));
height_label->labelsize(12);
height_label->align(Fl_Align(FL_ALIGN_INSIDE|FL_ALIGN_LEFT));
height = new Fl_Input(220,65,45,20,"");
execution = new Fl_Button(290,10,50,30,"実行");
execution->color(fl_rgb_color(112,128,144));
execution->labelcolor(fl_rgb_color(255,239,213));
execution->labelsize(14);
execution->callback(test);
execution->when(FL_WHEN_RELEASE); // 省略可
clear = new Fl_Button(290,50,50,30,"クリア");
clear->color(fl_rgb_color(112,128,144));
clear->labelcolor(fl_rgb_color(255,239,213));
clear->labelsize(14);
output = new Fl_Multiline_Output(50,115,240,100,"");
window->end();
window->show(argc, argv);
return Fl::run();
}