[Python] AI 07 Chainer + MNISTによる深層学習

[macOS Catalina 10.15.7]

日本で開発されている深層学習フレームワークChainerと手書き数字データセットMNISTを使って深層学習してみました。

今回は学習モデルの作成・検証と保存です。

教本で使っているChainnerのバージョン5.0.0に対し、現在pipでダウンロードできる最新は7.8.0です。イテレータのリセット方法が違うので注意が必要です。

教本ではリセットする位置がprintの前になっていますが、後に持ってくるのが妥当かと思います。でないとエポックが切り替わる最後の検証結果が出力できません。

ここから中級になりますが、Pythonの文法的にも急に難易度が高くなる印象です。Chainerの過去バージョンを使いJupyter Notebookで単純になぞる分には問題ないものの、最新バージョンを使う場合はコードを修正する必要があるので脱落者が一気に増えそうな気がします。

import numpy as np
import matplotlib.pyplot as plt
import chainer
import chainer.links as L
import chainer.functions as F
from chainer import iterators
from chainer import optimizers
from chainer.dataset import concat_examples
from chainer import serializers

print(f'chainerバージョン {chainer.__version__}')

class MLP(chainer.Chain):
    def __init__(self, number_hidden_units=1000, number_out_units=10):
        super(MLP, self).__init__()

        with self.init_scope():
            self.layer1=L.Linear(None, number_hidden_units)
            self.layer2=L.Linear(number_hidden_units, number_hidden_units)
            self.layer3=L.Linear(number_hidden_units, number_out_units)

    def __call__(self, input_data):
        result1 = F.relu(self.layer1(input_data))
        result2 = F.relu(self.layer2(result1))
        return self.layer3(result2)

def testEpoch(train_iterator,loss):
    print(f'学習回数:{train_iterator.epoch:02d} --> 学習損失:{float(loss.data):.02f}')

    # 検証用損失と精度
    test_losses = []
    test_accuracies = []

    i = 1
    while True:
        test_dataset = test_iterator.next()
        test_data, test_teacher_labels = concat_examples(test_dataset)

        # 検証データをモデルに渡す
        prediction_test = model(test_data)

        # 検証データに対して得られた予測値と正解を比較し損失を算出する
        loss_test = F.softmax_cross_entropy(prediction_test, test_teacher_labels)
        test_losses.append(loss_test.data)

        # 精度を計算する
        accuracy = F.accuracy(prediction_test, test_teacher_labels)
        test_accuracies.append(accuracy.data)

        print(f'{i}回目 検証損失:{np.mean(test_losses):.4f} 検証精度:{np.mean(test_accuracies):.2f}')
        
        # Chainer7.8.0用にリセット方法を変更
        if test_iterator.is_new_epoch:
            print('\n',end='') # 1回だけ改行
            test_iterator.reset()
            break

        i = i + 1

train_data, test_data = chainer.datasets.get_mnist(withlabel=True, ndim=1)

model = MLP()

# print('入力層のバイアスパラメータ配列の形\n', model.layer1.b.shape)
# print('初期化後の値\n', model.layer1.b.data)

BATCH_SIZE = 100

train_iterator = iterators.SerialIterator(train_data, BATCH_SIZE)
test_iterator = iterators.SerialIterator(test_data, BATCH_SIZE,
repeat=False, shuffle=False)

optimizer = optimizers.SGD(lr=0.01)
optimizer.setup(model)

MAX_EPOCH = 5

loss_list = list()
while train_iterator.epoch < MAX_EPOCH:
    # 学習データセットをイテレータから取り出す
    train_dataset = train_iterator.next()

    # 学習データセットを学習データと正解データに分離する
    train_data, teacher_labels = concat_examples(train_dataset)

    # 予測値の計算をする
    prediction_train = model(train_data)

    # 得られた予測値と正解データと比較し学習損失を計算する
    loss = F.softmax_cross_entropy(prediction_train, teacher_labels)

    # ニューラルネットワークの中の勾配を初期化する
    model.cleargrads()

    # 勾配を計算する
    loss.backward()

    # 損失を反映してパラメータを更新する
    optimizer.update()

    # 一回学習(epoch)する度に検証データに対する予測精度を計る
    if train_iterator.is_new_epoch:
        loss_list.append(loss)
        print(loss_list)
        testEpoch(train_iterator,loss)

# 学習済モデルを保存する
serializers.save_npz('chainer-mnist.model', model)
[Python] AI 06 手書き数字の認識 不正解画像の表示

前回の続きです。

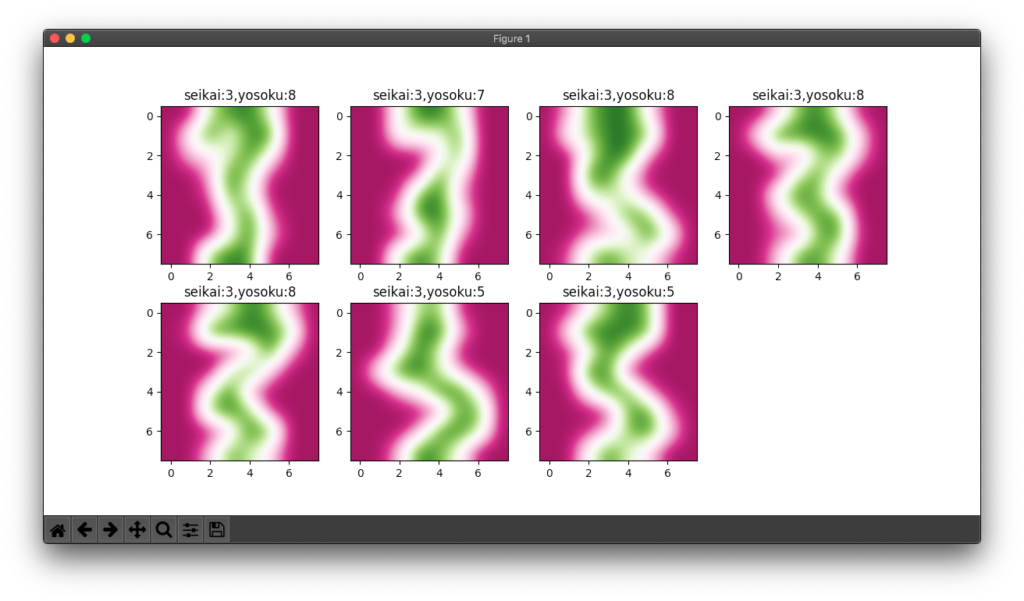
不正解が多かった3の該当画像を一括表示しました。確かに間違えやすい書き方だということが分かります。

from sklearn import datasets
import sklearn.svm as svm
import matplotlib.pyplot as plt

# 手書き数字のデータをロード
digits = datasets.load_digits()

# 画像データを変数all_featuresに、画像内容(数字)を変数teacher_labelsに格納
all_features = digits.data
teacher_labels = digits.target

num_samples = len(all_features)

model = svm.SVC(gamma = 0.001)

# 学習用の学習データと正解データ(1500個)
train_features=all_features[ : 1500 ]
train_teacher_labels=teacher_labels[ : 1500 ]
print(len(train_features))

# 検証用の学習データと正解データ(297個)
test_feature=all_features[1500 : ]
test_teacher_labels=digits.target[1500 : ]
print(len(test_feature))

# 学習実行
model.fit(train_features,train_teacher_labels)

# 数値予測データと検証用画像データ
predicted = model.predict(test_feature)
test_images = digits.images[1500 : ]

# 図のサイズ設定
fig = plt.figure(figsize=(12, 6))

# 前回記事で不正解が多かった3の画像で不正解のものを表示する
i = 1
for la,pre,img in zip(test_teacher_labels,predicted,test_images):
    if la == 3 and la != pre:
        plt.subplot(2, 4, i)
        plt.imshow(img, cmap='PiYG', interpolation='bicubic')
        plt.title(f'seikai:{la},yosoku:{pre}')
        i = i + 1

plt.show()

[Python] AI 05 手書き数字の認識 SVCによる予測

手書き数字の画像データ群を使ってSVCで学習させ、学習能力を検証しました。

digitsデータ1797個の内、1500個を学習、297個は検証に使いました。正解率は3の読み間違いが多いという結果でした。

ただdigits.dataというフラットなデータがあるにもかかわらず、何故わざわざ入れ子リストのdigits.imagesを平滑化するのかが分かりませんでした。

from sklearn import datasets
import sklearn.svm as svm
from sklearn.metrics import confusion_matrix
from sklearn.metrics import classification_report

# 手書き数字のデータをロード
digits = datasets.load_digits()

# 画像データを変数all_featuresに、画像内容(数字)を変数teacher_labelsに格納
all_features = digits.data
teacher_labels = digits.target

num_samples = len(all_features)

model = svm.SVC(gamma = 0.001)

# 学習用の学習データと教師データ(1500個)
train_features=all_features[ : 1500 ]
train_teacher_labels=teacher_labels[ : 1500 ]
print(len(train_features))

# 検証用の学習データと教師データ(297個)
test_feature=all_features[1500 : ]
test_teacher_labels=digits.target[1500 : ]
print(len(test_feature))

# 学習実行
model.fit(train_features,train_teacher_labels)

# 正解と数値予測データ
expected = test_teacher_labels
predicted = model.predict(test_feature)

print(f"分類機による分類結果 {model}: \n {classification_report(expected, predicted)} \n")

print(f"コンフュージョンマトリックス:\n {confusion_matrix(expected, predicted)}")
--------------------------------------------------

出力
--------------------------------------------------
1500
297
分類機による分類結果 SVC(gamma=0.001): 
               precision    recall  f1-score   support

           0       1.00      0.96      0.98        27
           1       0.97      1.00      0.98        31
           2       1.00      1.00      1.00        27
           3       0.96      0.77      0.85        30
           4       0.97      0.91      0.94        33
           5       0.91      1.00      0.95        30
           6       1.00      1.00      1.00        30
           7       0.97      1.00      0.98        30
           8       0.79      0.96      0.87        28
           9       1.00      0.94      0.97        31

    accuracy                           0.95       297
   macro avg       0.96      0.95      0.95       297
weighted avg       0.96      0.95      0.95       297
 

コンフュージョンマトリックス:
 [[26  0  0  0  1  0  0  0  0  0]
 [ 0 31  0  0  0  0  0  0  0  0]
 [ 0  0 27  0  0  0  0  0  0  0]
 [ 0  0  0 23  0  2  0  1  4  0]
 [ 0  0  0  0 30  0  0  0  3  0]
 [ 0  0  0  0  0 30  0  0  0  0]
 [ 0  0  0  0  0  0 30  0  0  0]
 [ 0  0  0  0  0  0  0 30  0  0]
 [ 0  1  0  0  0  0  0  0 27  0]
 [ 0  0  0  1  0  1  0  0  0 29]]

[Python] AI 04 手書き数字の認識 データセット3D描画

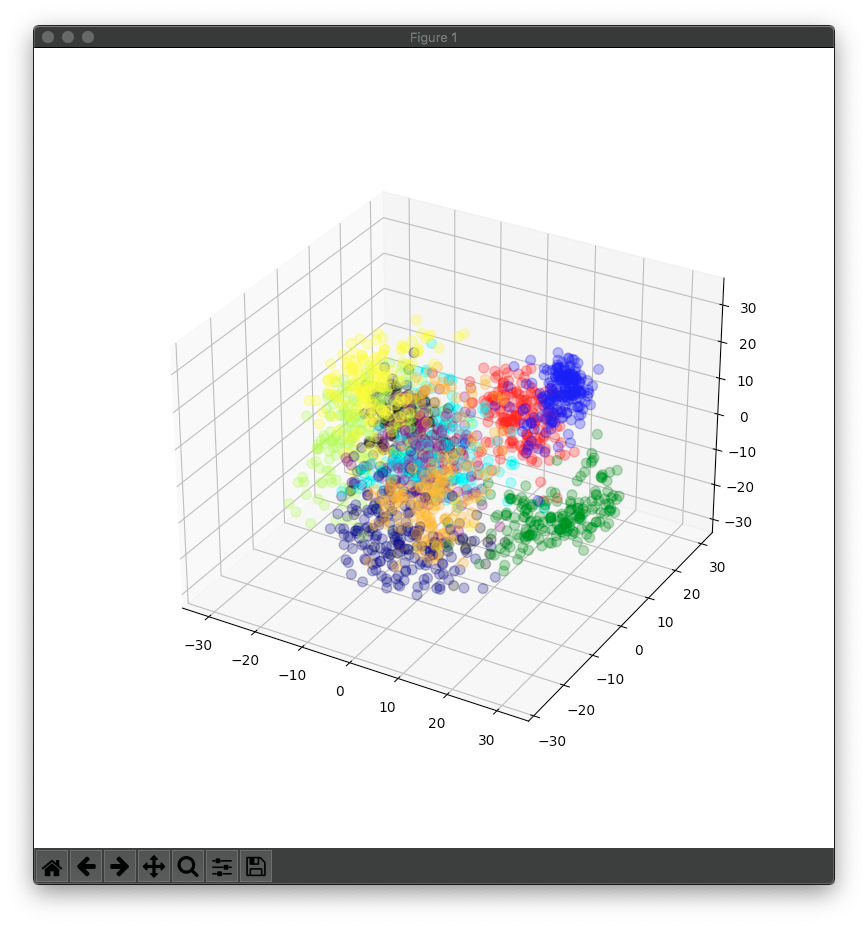
手書き数字画像のデータセットについて64因子を3因子に減らし、3D散布図を描画しました。

分かりやすくするためとは言え、elifが8つも連なるようなコードは書かない方がいいと思います(教本P232)。AI専業であっても最低限のコーディング力は必要でしょう。

from sklearn import decomposition
from sklearn import datasets
import matplotlib.pyplot as plt

def getcolor(num):
    color_list = ['red','orange','yellow','greenyellow','green','cyan','blue','navy','purple','black']
    return color_list[num]

# 手書き数字のデータをロード
digits = datasets.load_digits()

# 画像データを変数all_featuresに、画像内容(数字)を変数teacher_labelsに格納
all_features = digits.data
teacher_labels = digits.target

# 主成分分析(3因子に減らす)
pca = decomposition.PCA(n_components=3)

# 64因子のall_featuresを3因子のthree_featuresに変換
three_features = pca.fit_transform(all_features)

# figureオブジェクト作成サイズを800*800とする
fig = plt.figure(figsize=(8, 8))

# 1*1グリッドのサブプロット1に3D描画する
subfig = fig.add_subplot(111, projection = '3d')

# teacher_labelsに対応する色のリストを作成
colors = list(map(getcolor, teacher_labels))

# データの3Dカラー散布図描画設定
subfig.scatter(three_features[ : , 0 ], three_features[ : , 1 ], three_features[ : , 2 ], s=50, c=colors, alpha=0.3)

# グラフを表示
plt.show()

[Python] AI 03 手書き数字の認識

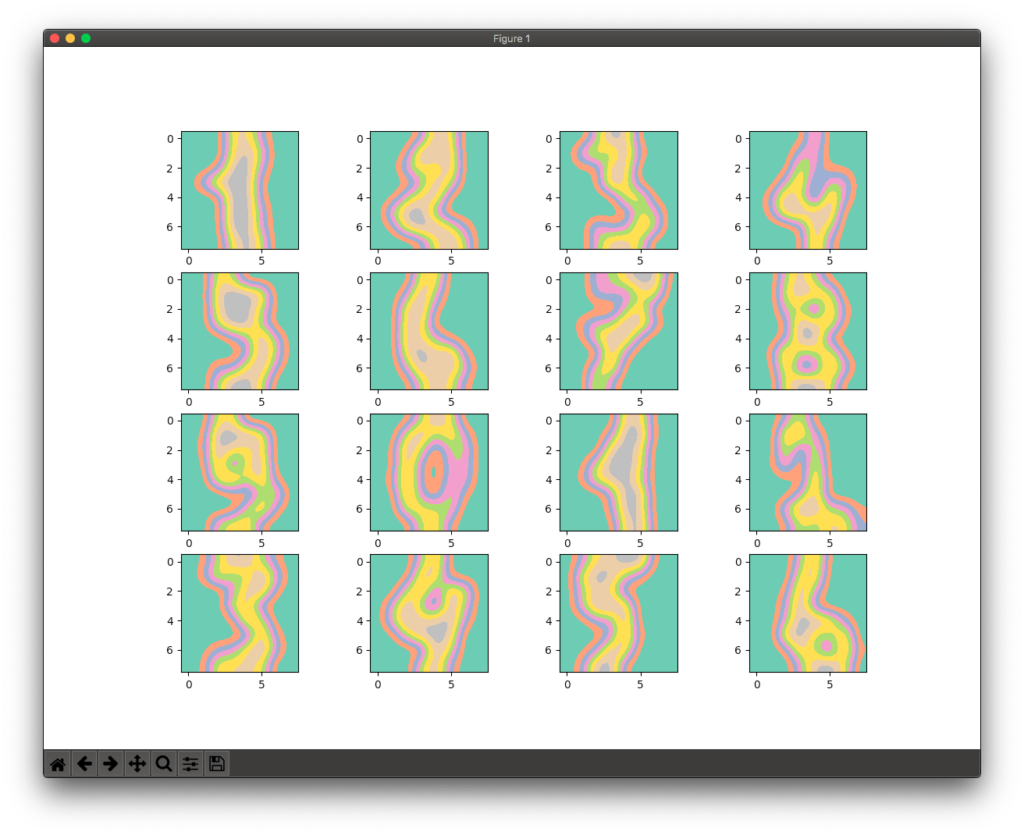
sklearnのdatesetsにあるdigitsという手書き数字の画像データを使ってデータの一部を表示しました。

今回はdigitsの最初の16個の画像データを4行*4列に並べました。

ここまで教本を読んで、スクリプトを書いた方のPython記述スキルが相当怪しいということが判明しました。あくまで対話式のPythonをある程度使えるAIの専門家なのでしょう。

なのでプログラミングの心得がある方は、スクリプトの意図を理解して自分でコードを書くのが賢明かと思います。

今回のスクリプトにしても意味不明な箇所があり、自分で整理すると13行が10行になりました(画像間の隙間調整は省略)。

from sklearn import datasets
import matplotlib.pyplot as plt

digits = datasets.load_digits()
ROWS_COUNT = 4
COLUMNS_COUNT = 4
DIGIT_GRAPH_COUNT = ROWS_COUNT * COLUMNS_COUNT

# figureオブジェクト作成サイズを1200*900に設定
fig = plt.figure(figsize=(12, 9)) 

for i in range(1, DIGIT_GRAPH_COUNT + 1):
    (fig.add_subplot(ROWS_COUNT, COLUMNS_COUNT, i)).imshow(digits.images[i],interpolation='bicubic', cmap='Set2')

plt.show()

[Python] AI 02 アヤメの分類 超平面作成

前回の続きです。

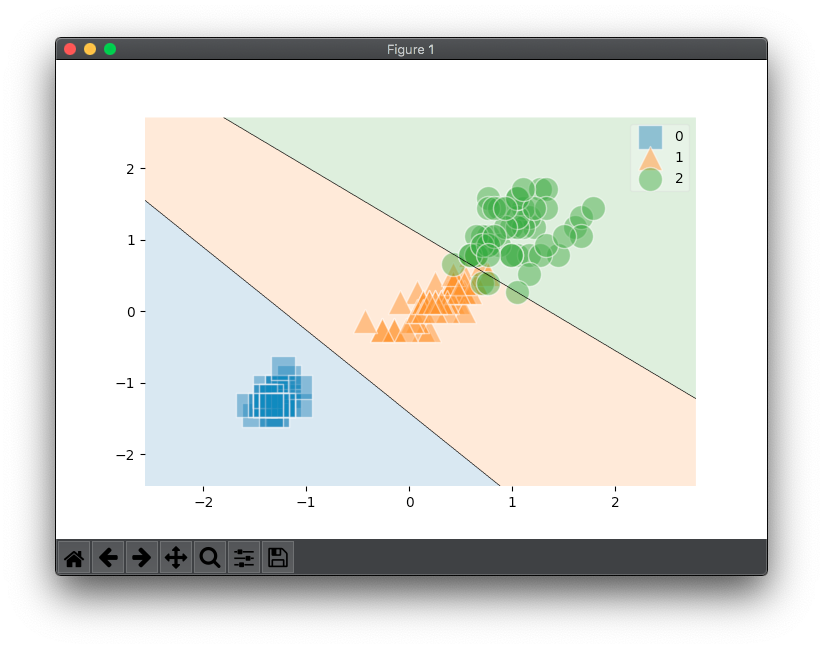
アヤメの花弁データ(3列目と4列目)をサポートベクターマシン(SVM)を使って超平面で分類できるようにしました。

手順としては、データを標準化してからSVMのインスタンスを生成してモデル学習させ散布図を作成します。最後に適当な花弁データを入力してアヤメのどの種に該当するのか判定させています。

私の教本ではその前にデータを交差検証するために学習データと検証データに分けて、検証後に標準化データを結合して超平面を作成しています。

本の構成のためでしょうが、教本の方法は少々荒っぽいかと思います。統計学をかじったことのある方でしたら理由は分かるでしょう。

import numpy as np
import matplotlib.pyplot as plt
from mlxtend.plotting import plot_decision_regions as pdr
from sklearn import datasets
from sklearn.preprocessing import StandardScaler
from sklearn.svm import SVC

def test():
    model = analize()
    test_data=np.array([[3.0,4.0]])
    print(test_data)
    test_result = model.predict(test_data)
    print(test_result)
    plt.show()

def analize():
    iris = datasets.load_iris()

    features = iris.data[:,[2,3]]
    print(features)
    labels = iris.target

    sc = StandardScaler()
    sc.fit(features)

    # データの標準化(中心を0にするための変換)
    features_std = sc.transform(features)
    print(features_std)

    # 線形SVMのインスタンスを生成
    model = SVC(kernel='linear', random_state=None)

    # モデル学習
    model.fit(features_std, labels)

    fig = plt.figure(figsize=(12,8))

    # 散布図関連設定
    scatter_kwargs = {'s': 300, 'edgecolor': 'white', 'alpha': 0.5}
    contourf_kwargs = {'alpha': 0.2}
    scatter_highlight_kwargs = {'s': 200, 'label': 'Test', 'alpha': 0.7}
    
    pdr(features_std, labels, clf=model, scatter_kwargs=scatter_kwargs,
                        contourf_kwargs=contourf_kwargs,
                        scatter_highlight_kwargs=scatter_highlight_kwargs)

    return model

if __name__ == "__main__":
    test()
--------------------------------------------------

出力(検証データと判定結果のみ)
--------------------------------------------------
[[3. 4.]]
[2]

[Python] AI 01 アヤメの分類

せっかくPythonを扱っているのですから、AIや機械学習についても一通り学ぶことにしました。まずは統計に関する知識の整理です。

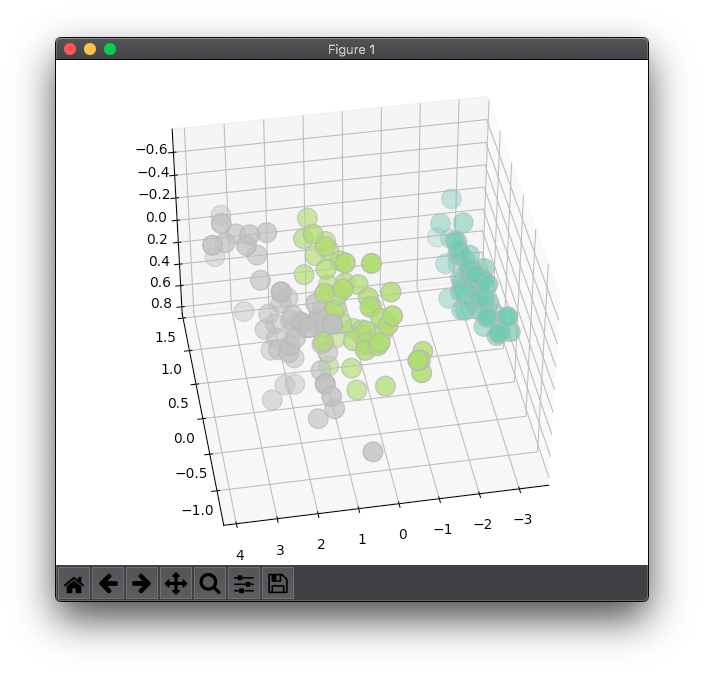
有意差検定など統計の勉強でお世話になったアヤメのデータを使って主成分分析し、因子数を4から3に減らして3D散布図を作成しました。

選んだ教本ではJupyter Notebookを使った対話式Pythonですが、プログラムで書いていきます。

3000円を超える本なのにグラフが白黒なのが惜しいところです。

2021/10/1追記:グラフはGitHubからダウンロードしたipynbファイルにてカラーで見ることができました。

pip install -U scikit-learn
pip install matplotlib
import matplotlib.pyplot as plt
from sklearn import datasets
from mpl_toolkits.mplot3d import Axes3D
from sklearn.decomposition import PCA

iris = datasets.load_iris()
all_features = iris.data
teacher_labels = iris.target

fig = plt.figure(1,figsize=(12,9))
ax = Axes3D(fig,elev=-140,azim=100)

# 主成分分析(4→3)
reduced_features = PCA(n_components=3).fit_transform(all_features)

# 散布図作成
ax.scatter(reduced_features[:,0],reduced_features[:,1],reduced_features[:,2],c = teacher_labels,cmap = plt.cm.Set2,edgecolor='darkgray',s=200)
plt.show()

[C言語] 文字列のコピー ポインタ変数の加算

自製str_copy関数のwhile文をポインタ変数の加算で書くと高速化できました。

以下のコードをそれぞれ走らせ処理時間を測ったところ、リストのインデックス加算に比べて1.5倍の速さになります。

strcpy関数はポインタ変数の加算になっているようです。

#include <stdio.h>

char *str_copy(char *d, const char *s)
{
	char *t = d;

	while (*d++ = *s++)
		;
	return t;
}

int main(void)
{
	char str[128] = "ABC";
	char tmp[128] = "DEF";

	printf("str = \"%s\"\n", str);

	str_copy(str, tmp);

	puts("コピーしました。");
	printf("str = \"%s\"\n", str);

	return 0;
}
#include <stdio.h>

char *str_copy(char *d, const char *s)
{
	int i=0;

	while (d[i] = s[i])
		i++;
	return d;
}

int main(void)
{
	char str[128] = "ABC";
	char tmp[128] = "DEF";

	printf("str = \"%s\"\n", str);

	str_copy(str, tmp);

	puts("コピーしました。");
	printf("str = \"%s\"\n", str);

	return 0;
}
import subprocess,time,datetime

start = time.time()

proc = subprocess.run("list1106_mac2", shell=True, stdout= subprocess.PIPE, stderr = subprocess.PIPE)
print(proc.stdout.decode('UTF-8'))

# 処理時間算出
process_time = time.time() - start
td = datetime.timedelta(seconds = process_time)
dt_now = datetime.datetime.now()

print('ポインタ加算 処理終了 ' + str(td) + ' ' + str(dt_now))

start2 = time.time()

proc = subprocess.run("list1106a_mac2", shell=True, stdout= subprocess.PIPE, stderr = subprocess.PIPE)
print(proc.stdout.decode('UTF-8'))

# 処理時間算出
process_time2 = time.time() - start2
td2 = datetime.timedelta(seconds = process_time2)
dt_now2 = datetime.datetime.now()

print('インデックス加算 処理終了 ' + str(td2) + ' ' + str(dt_now2))
--------------------------------------------------

出力
--------------------------------------------------
str = "ABC"
コピーしました。
str = "DEF"
ポインタ加算 処理終了 0:00:00.007981 2021-07-20 14:05:55.569973

str = "ABC"
コピーしました。
str = "DEF"
インデックス加算 処理終了 0:00:00.012111 2021-07-20 14:05:55.582141

[C言語] ポインタの概念 その3 Pythonとの比較

数値を代入した場合の2変数のポインタの状態をPythonと比較しました。

C言語ではポインタのアドレスは変わらずxとyで異なるまま、一方Pythonでは同じアドレスになりました。

これが何を意味するのか、手掛かりがあれば調べたいところです。

#include <stdio.h>;
#include <stdlib.h>;

main()
{
int x = 1,y= 2;
int *ip;

    ip =&x;
    y = x;
 
    printf("xの値 %d\n",x);
    printf("yの値 %d\n",y);

    printf("xのアドレス %p\n",&x);
    printf("yのアドレス %p\n",&y);
    printf("*ipのアドレス %p\n",ip);
}
--------------------------------------------------

出力
--------------------------------------------------
xの値 1
yの値 1
xのアドレス 0x7ffeecb5967c
yのアドレス 0x7ffeecb59678
*ipのアドレス 0x7ffeecb5967c
>>> a=0
>>> b=3
>>> print(id(a))
140573474482448
>>> print(id(b))
140573474482544
>>> b=a
>>> print(id(b))
140573474482448
>>> print(id(a))
140573474482448

[Python] exe化ツール v0.0.2 標準出力のデコード

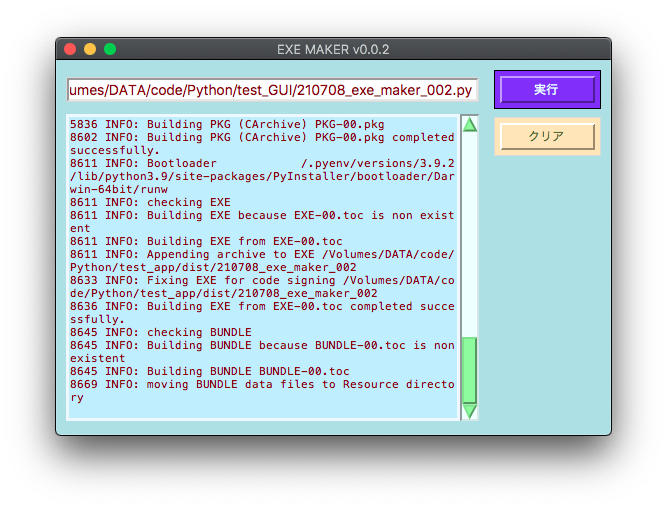
前回の波カッコの問題は標準出力をデコードすることで解決しました。

実行前、distディレクトリ内に関連する旧ファイルがあれば手動で削除しておく必要があります(コードでは権限を変えても削除できませんでした)。

これでとりあえず完成でしょうか。

ただし、このコード自身をexe化してもうまく動作しないです。他のコードに対しては正常にexe化できます。カレントディレクトリを変更したりするのが良くないのかもしれません。

<関連箇所のみ>

def exe_make(path):
    # ソースコードの作業ディレクトリへのコピー
    working_dir = '/test_app/'
    new_path = working_dir + (path.split('test_GUI/'))[1]
    print(f'new_path {new_path}')
    shutil.copy2(path, new_path)

    # buildディレクトリ内関連ディレクトリの削除
    filename = (path.split('test_GUI/'))[1][:-3]
    remove_dir = '/test_app/build/' + filename + '/'
    try:
        shutil.rmtree(remove_dir)
    except:
        pass

    # 作業ディレクトリ内specファイルの削除
    all_files2 = [path for path in glob.glob('/test_app/*.spec')]
    remove_files2 = [path for path in all_files2 if filename in path]
    print(remove_files2)
    if len(remove_files2) != 0:
        for path in remove_files2:
            os.remove(path)

    # カレントディレクトリを作業ディレクトリへ変更
    os.chdir('/test_app/')

    # exeファイル作成コマンド実行
    def run(cmd):
        proc = subprocess.Popen(cmd, shell=True, stdout=subprocess.PIPE, stderr=subprocess.STDOUT)

        while True:
            line = proc.stdout.readline()
            if line:
                yield line
            if not line and proc.poll() is not None:
                break

    cmd = f"pyinstaller {new_path} --onefile --noconsole"
    lines = []
    for line in run(cmd):
        sys.stdout.buffer.write(line)
        lines.append(line.decode('utf-8'))
    lines_con = ''.join(lines)
    list_text()[0].insert(tk.END,'exeファイル作成完了\n')

    return lines_con

# Button設定
btn = ttk.Button(frame, text="実行",command=lambda:[list_text()[0].insert(tk.END,exe_make(entry.get())),auto_scroll()],width=8,style= 'MyWidget.TButton')
btn.grid(row=0,column=2,sticky=tk.W,padx=10)