[M1 Mac, Big Sur 11.6.5, no Xcode]
画面サイズの取得方法は以下の通りです。
int width = [[NSScreen mainScreen] frame].size.width;
int height = [[NSScreen mainScreen] frame].size.height;[M1 Mac, Big Sur 11.6.5, no Xcode]
画面サイズの取得方法は以下の通りです。
int width = [[NSScreen mainScreen] frame].size.width;
int height = [[NSScreen mainScreen] frame].size.height;[M1 Mac, Big Sur 11.6.5, no Xcode]
ボタンを配置しました。ボタンタイトルの色を設定できないので、Windowの背景色をやむなくデフォルトに戻しました。
設定の仕方が単純ではないというだけでできないわけではないと思います。一部機能ではFLTKに及ばないと考えるのが妥当でしょう。

<該当箇所のみ>

button1 = [[[NSButton alloc] initWithFrame:NSMakeRect(290, 265-30-10, 60, 30)] autorelease];
[button1 setFont:[NSFont fontWithName:@"Arial" size:12]];
[button1 setTitle:@"実行"];
[button1 setBezelStyle:NSBezelStyleRegularSquare];
[button1 setTarget:self];
[button1 setAction:@selector(OnButton1Click:)];
[button1 setAutoresizingMask:NSViewMaxXMargin | NSViewMinYMargin];[M1 Mac, Big Sur 11.6.5, no Xcode]
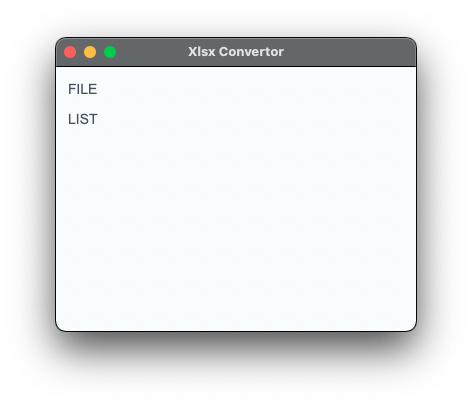
テキストラベルを配置しました。書き方自体はSwiftやFLTKと似ているため、角括弧への違和感が取れないながらも少しずつ慣れてきました。
Windowや図形のY座標は、ディスプレイやWindowの縦サイズから図形の高さと左上基準のY座標を引く必要がありややこしいです。
あとはテキストエリアとボタン類なのでGUIについてはスムーズに実装できそうです。
#include <Cocoa/Cocoa.h>

@interface ConvertorWindow : NSWindow {
  NSTextField* label1;
  NSTextField* label2;
}
- (instancetype)init;
- (BOOL)windowShouldClose:(id)sender;
@end

@implementation ConvertorWindow
- (instancetype)init {
	NSColor *background = [NSColor colorWithCalibratedRed:(double)247/255 green:(double)252/255 blue:(double)254/255 alpha:1.0f];
	NSColor *foreground = [NSColor colorWithCalibratedRed:(double)57/255 green:(double)63/255 blue:(double)76/255 alpha:1.0f];

	label1 = [[[NSTextField alloc] initWithFrame:NSMakeRect(10, 265-16-15, 34, 16)] autorelease];
	[label1 setFont:[NSFont fontWithName:@"Arial" size:14]];
	[label1 setStringValue:@"FILE"];
	[label1 setBezeled:NO];
	[label1 setDrawsBackground:NO];
	[label1 setEditable:NO];
	[label1 setSelectable:NO];
	[label1 setTextColor:foreground];

	label2 = [[[NSTextField alloc] initWithFrame:NSMakeRect(10, 265-16-45, 34, 16)] autorelease];
	[label2 setFont:[NSFont fontWithName:@"Arial" size:14]];
	[label2 setStringValue:@"LIST"];
	[label2 setBezeled:NO];
	[label2 setDrawsBackground:NO];
	[label2 setEditable:NO];
	[label2 setSelectable:NO];
	[label2 setTextColor:foreground];

	[super initWithContentRect:NSMakeRect(100, 1080-265-100, 360, 265) styleMask:NSWindowStyleMaskTitled | NSWindowStyleMaskClosable | NSWindowStyleMaskMiniaturizable | NSWindowStyleMaskResizable backing:NSBackingStoreBuffered defer:NO];
	[self setTitle:@"Xlsx Convertor"];
	[[self contentView] addSubview:label1];
	[[self contentView] addSubview:label2];
	[self setIsVisible:YES];
	[self setBackgroundColor:background];
	return self;
}

- (BOOL)windowShouldClose:(id)sender {
  [NSApp terminate:sender];
  return YES;
}
@end

int main(int argc, char* argv[]) {
  [NSApplication sharedApplication];
  [[[[ConvertorWindow alloc] init] autorelease] makeMainWindow];
  [NSApp run];
}[M1 Mac, Big Sur 11.6.5, no Xcode]
CMakeが作成したMakefileにアイコン設定を追記しました。
以下のようにallの箇所に追記して、make allコマンドを実行するとappファイル作成&アイコン設定できます。このコマンドにより、imagesディレクトリにあるicnsファイルをappファイル内にコピーし、info.plistのkeyとvalueを上書きします。
# The main all target
all: cmake_check_build_system
	$(CMAKE_COMMAND) -E cmake_progress_start /code/ObjectiveC/projects/XlsxConvertor02/build/CMakeFiles /code/ObjectiveC/projects/XlsxConvertor02/build//CMakeFiles/progress.marks
	$(MAKE) $(MAKESILENT) -f CMakeFiles/Makefile2 all
	$(CMAKE_COMMAND) -E cmake_progress_start /code/ObjectiveC/projects/XlsxConvertor02/build/CMakeFiles 0
	# 以下3行を追記
	mkdir XlsxConvertor.app/Contents/Resources
	cp ../images/XlsxConvertor.icns XlsxConvertor.app/Contents/Resources
	plutil -replace 'CFBundleIconFile' -string "XlsxConvertor.icns" XlsxConvertor.app/Contents/Info.plist
.PHONY : all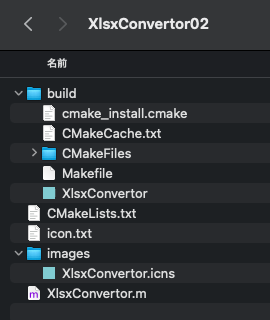
[M1 Mac, Big Sur 11.6.5, no Xcode]
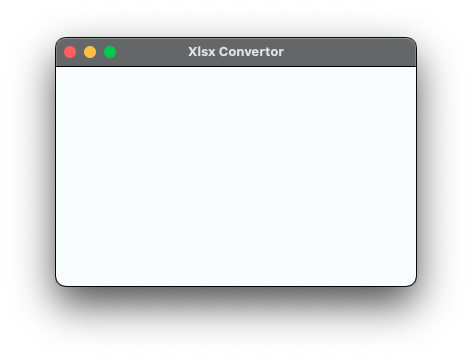
まずはWindowを作成し、タイトルと背景色を設定しました。
何でもない内容ですが、手本となるサンプルコードを探すのに少々苦労しました。Xcodeを使わずに、エディタとターミナルだけでアプリを作成していきます。
Objective-Cの本を2冊購入しましたが、レガシー言語だからか状態の良い中古本で1冊800円程度でした。今のところパラパラと見た位で結局GitHubにある本とは関係のないサンプルコードを取っ掛かりの教材にしています。実践が先で理屈は後回しです。
Objective-CではMakefileがCMakeで簡単に作成できます。C++ではコンパイルやビルドのオプション探索に苦労していましたが、簡潔なCMakeLists.txtに丸投げで済みそうです。C++のCMakeはかなりとっつきにくい印象でした。
特徴的な点を以下に挙げておきます。
1.座標の原点が左上ではなく左下。左上基準の場合、ディスプレイの解像度がわからないとY座標が算出できない。
2.RGBはSwiftとは異なり、分数だけではNG。エラーにはならないが色がおかしくなる。(double)などで小数への変換が必要。
3.MakefileはCMakeに作らせても簡単。
#include <Cocoa/Cocoa.h>

int main(int argc, char* argv[]) {
  NSColor* background = [NSColor colorWithCalibratedRed:(double)247/255 green:(double)252/255 blue:(double)254/255 alpha:1.0f];

  NSWindow* window = [[[NSWindow alloc] initWithContentRect:NSMakeRect(100, 1080-220-100, 360, 220) styleMask:NSWindowStyleMaskTitled | NSWindowStyleMaskClosable | NSWindowStyleMaskMiniaturizable | NSWindowStyleMaskResizable backing:NSBackingStoreBuffered defer:NO] autorelease];
  [window setIsVisible:YES];
  [window setTitle:@"Xlsx Convertor"];
  [window setBackgroundColor:background];
  [NSApplication sharedApplication];
  [NSApp run];
}
cmake_minimum_required(VERSION 3.1)
# Project
Project(XlsxConvertor VERSION 1.0.0)
find_library(COCOA_LIBRARY Cocoa)
# Options
set(MACOSX_BUNDLE_BUNDLE_VERSION ${PROJECT_VERSION})
set(MACOSX_BUNDLE_COPYRIGHT "Copyright (C) 2022")
set(MACOSX_BUNDLE_INFO_STRING "The name of this app is XlsxConvertor")
set(MACOSX_BUNDLE_GUI_IDENTIFIER "xxx.xxx.XlsxConvertor")
# XlsxConvertor
add_executable(${PROJECT_NAME} MACOSX_BUNDLE XlsxConvertor.m)
target_link_libraries(${PROJECT_NAME} ${COCOA_LIBRARY})